Beaumaris is on a big island, the Isle of Anglesey, and like Conwy it was a castle town, an English enclave surrounded by Welsh guerrillas. Begun in 1295 in response to a revolt a year earlier, it was the last link in King Edward’s “Iron Chain” of castles enclosing Gwynedd, the former kingdom of North Wales. Beaumaris Castle is a high point of medieval  castle design. Built on flat marshy ground with no natural defenses, the castle incorporates concentric rings of fortifications – a double ring of walls surrounded by a moat. The innermost wall is higher than the outer, providing greatly increased firepower. A fortified dock was built to give sea access, allowing the castle to withstand sieges (as shown in the picture, the sea is more distant now). However, problems in Scotland shifted the king’s priorities, and the castle was never finished. An artist’s concept
  of what the castle would have looked like, had it been finished, is shown to the left. The picture shows a much more imposing structure that would have been twice the height of the squat one we see today. The inner walls look particularly impenetrable. The south gate seen at the lower right faced the sea and was the main castle entrance as well as the dock. A magnification of this artist’s rendition is shown below, along with a picture of the way it looks now. The red arrows point to the dock’s


door to the castle. Rather than using a harbor, this man-made dock used a wide shipping channel (now covered over) to deliver supplies. Ships up to 40 tons could sail in at high tide and unload goods through the castle wall doorway. The dock would be defended from the Gunner’s Walk, which can be seen to the right of the arrow in the left picture above, as well as at the top of the castle schematic  shown here. Beneath the Gunner’s Walk was a corn mill for self-sufficiency, the mill turned by differences in water level between the moat and the sea. Whereas the water in the dock was supplied by the sea, the water in the moat was supplied by a freshwater stream; the level between the two was regulated by a sluice gate in the Gunner’s Walk. How clever! The town wall started from here, but wasn’t finished until 1414.
The main entrance to the castle, shown in the paired pictures above, is to the left of the dock and was very well protected. First there was the moat, then a drawbridge, then the outer gate. If you got through that, there were the multiple defenses of the inner gate, with every stage having high- and low-level arrow loops. The inner-wall gatehouse was defended by a barbican, then by three successive pairs of barred gates and portcullises. Further, the outer wall south gate was off-set from the inner gatehouse, so attackers moving between gates would be exposed from more sides to archers waiting above.
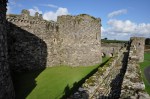
Pictures of the outer walls, which form a rough octagon, are shown below. The walls had 15 towers, and with arrow loops at two or three levels there were over 300 shooting
 Beaumaris Castle")


positions for the archers inside. And of course the taller inner walls provided yet more firepower.
From the schematic of the castle shown above, you can see there isn’t a lot of space between the inner and outer walls – it’s function was to be a killing space. As shown in the pictures below, the inner walls look forbidding, but imagine them being twice that height

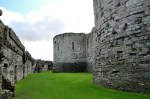

had the castle been finished. The inner walls are 16 feet thick, with inner passageways – and plenty of latrines! The inner walls sometimes have 3 levels of latrines, examples shown below.


OK, let’s enter the inner ward! Beaumaris would have been the largest of King Edward’s


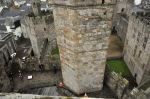
castles, and the intended accommodation within the inner ward, shown in the first picture below, was planned on a lavish scale. It would have had first-floor stables, kitchens, great hall and private chambers. Both gatehouses were planned to have grand arrangements of state rooms for the king and his family, an example shown in the second picture below.


The last picture above shows the unfinished north gate dominating the courtyard.
The castle also has a chapel; it’s in one of the inner wall middle towers (called the chapel tower, of course), and is accessible either from the inner ward or from the inner wall passageway.


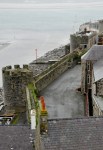
We’ll close with beautiful views from the castle across the Menai Straight to the


Snowdonia Mountains beyond.
Next post – Stow-on-the-Wold, and more, in the Cotswolds.


 A schematic of Caernarfon Castle is shown here. As you can see, it’s all walls and towers; construction was stopped in 1330 before it was completed. Although there were once interior buildings, none have survived.
")


 Arrow loops are everywhere in the walls, creating a veritable medieval machine gun. These arrow loops were high-tech for their time: not only were they angled to allow each archer to cover a wide area, they also had an angled central pillar in the center of each loop to provide extra protection.


 Returning to the Caernarfon Castle overview, re-shown here, the jutting structure behind the kitchen site is the unfinished rear of the King’s Gate, and across from that the Chamberlain Tower, with the North-East Tower, Watch Tower and Queen’s Gate in the background. The pictures below look in the opposite direction toward the huge three-

 picture of the Granary and North-East Towers, that there are notched walls ready for an expansion that never came.


 a good overview of the castle. Notice that it’s divided into two sections, a front and a back. The front was the working part of the castle; the back had the royal apartments. The castle was at the cutting edge of military technology, with thick walls, rounded towers and turrets providing lethal fields of fire, a solid rock base, and royal apartments that could be defended separately. Well supplied with fresh water from a spring-fed well, 91 feet down, and with its own dock, it could withstand sieges indefinitely. Nothing on this scale had been seen before in Wales, which at that time had no real cities. The last picture above and the picture to the left show how intimidating it still is.


 and the Great Hall dining area, shown in the lower right picture. A representation of how the chapel and dining hall looked in the 1280’s is shown here on the left. People ate here regardless of rank; status was indicated by distance from the top table (and the further away, the plainer the food).


 or guarded doors (upper level)")


 Not all went well on this trip to Conwy; descending a castle stairwell, perhaps foolishly in sandals, I slipped on a wet step and fell backward. I protected my camera, but alas, not my hand, as shown in the x-ray. I apparently sat on the hand, and the buns of steel did the rest; two fingers with spiral fractures. Broken fingers are bad enough, but worse, that’s the end of the plan to climb Mt. Snowdon. What a disaster! So back we go to poor Britt in Lincoln.