Glasgow I, The City

Glasgow lives in the shadow of its royal, history-ladened neighbor, Edinburgh (post Edinburgh II).  However, we liked Glasgow better, for several reasons:

  • Glasgow is a “real”city –  it’s not a big tourist destination, so you won’t find costumed sales folk hawking tours, and souvenir shops on every corner.
  • the architecture is fascinating – Victorian, playful facades, visionary Art Nouveau, and modern riffs off the latter.
  • There’s a lot of the incredible art and architecture of Charles Rennie Mackintosh and his  less-well-known wife, Margaret MacDonald.
  • And the museums aren’t bad either!

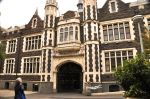
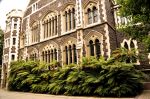
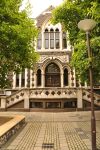
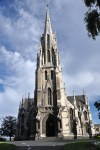
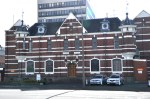
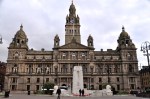
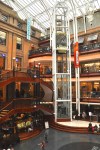
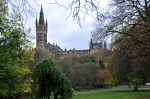
Let’s begin with some pictures of the streets and buildings of this interesting city.  Glasgow is a port city;  in its heyday (1800’s) it was a wealthy industrial powerhouse and Europe’s 6th biggest city.  Going into the 1900’s, while the rest of the UK was enthralled with Victorianism, working-class Glasgow veered into the modern, incorporating aspects of Minimalism, Art Nouveau, and even some Asian influence.  Today it’s an intriguing city that doesn’t take itself too seriously.  For example, look at the neoclassical Glasgow Gallery of Modern Art in the first picture below, with its Grecian columns; notice that the

equestrian statue (far left) sports a guy wearing an orange road hazard cone, and that the building’s mirrored mosaic is anything but neoclassical!  Or how about this building with the funky ironwork, from Glasgow’s days of iron forges?  Here, Glaswegians call sanded and polished concrete “Glasgow marble”.  There’s a lot of quirk and fun here.  More of the city is shown below.  OK, “more” is a lot of pictures, but then again the city is fascinating!

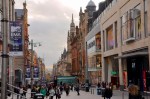
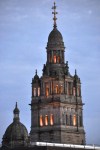
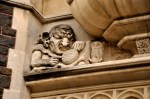
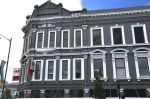
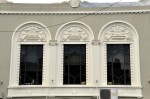
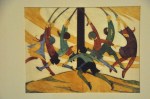
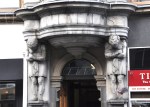
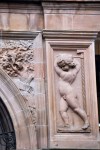
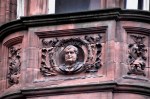
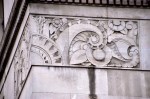
Even better, most of these buildings are covered with very artsy detail.  It pays to look up as you walk – a bit hazardous, but worth it; as shown below, the building facades are full of sculptures and friezes.

The people have fun too – one often encounters parties, sometimes bizarre, going on.

Not to mention, of course, the pervasive and wonderful Scotch bars!

It’s time for a little (a very little) art history.  In the late 1800’s a backlash against industrialization led to the “Arts and Crafts” movement, featuring hand-made objects with simple designs from nature.  With the new century approaching there was a creative energy for new styles for the new age.  In painting, one expression of new style was Impressionism.  In the design world the new style was “Art Nouveau”, which extended the Arts and Crafts emphasis on nature, incorporating  female figures and embracing modern manufacturing technologies to create flowing, linear, and abstract forms.

In Glasgow during this time, the Glasgow School of Art became one of the most successful art schools in the UK, with one of its students, Charles Rennie Mackintosh, winning many awards.  Staff and students developed their own approach to Art Nouveau, known as the “Glasgow Style”, that incorporated stylized, linear motifs based on nature.  A decade after Mackintosh graduated he was given a commission to build a new home for the Glasgow School of Art, with the freedom to design every detail.  It’s a pinnacle of artistic and architectural achievement.  A model is shown in the first picture below; well, I was

underwhelmed at first look, but this is a 1909 building, remember, and much here is actually new for the times.  The over-riding theme is ‘letting in the light’.  As you can see in the picture on the right, there are protruding iron arms at the base of the multi-paned windows with stylized roses at their ends (a Mackintosh trademark).  The arms were a new invention that reinforced those very large, fragile glass windows and allowed natural light to pour into the studios.  Throughout the building the lines are Modernist, with Asian

influences and Art Nouveau flourishes; examples shown above.  Alas, it’s a working school, without free access; the pictures above are pictures of pictures.  I can, however, show you tea rooms that Mackintosh designed.

When in 1875 a tea dealer placed table and chair in his shop and sold cups of freshly brewed tea, the tea room was born.  The idea quickly caught on.  Many city-center buildings were converted to tea rooms for meeting, relaxing and doing business – and they were a much better option than a bar for unescorted women.  The face of Glasgow tea rooms was Miss Cranston, who owned 4 of the largest; she favored modern design and unique decoration.  In 1896 Mackintosh was asked to design murals for one of her tea rooms, and his daring designs became a public talking point.  From 1900 on he was the sole designer of every aspect of her tea rooms.  1900 also marked Charles Mackintosh’s marriage to Margaret Macdonald, another graduate of the Glasgow School of Art, and together they collaborated on interior designs and artwork.  The pictures below are from

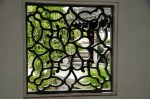
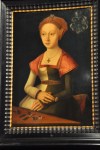
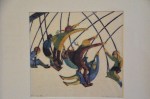
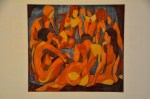
the “Ladies’ Luncheon Room” that Charles designed in 1900 (now in a museum); pay particular attention to the decorative panel that he did with Margaret (mostly Margaret’s style).  I think it’s fascinating – made with oil-painted gesso plaster on burlap and scrim, twine, glass beads, thread, mother-of-pearl & tin leaf.  There is more art that came from the tea room, of course; the related panel shown below, and beaten tin panels shown


just above.  In “The Dew”, the first picture above, Margaret drew the women’s hair, clothes and plant forms as one continuous looped line, broken only by small cascading circles and droplets – the title’s “Dew”.  Nice.

Mackintosh's Willow Tea Rooms, today
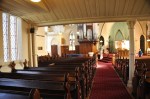
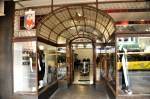
Our final look at a Mackintosh tea room is “The Willow TeaRooms and Gift Shop”.  These rooms are not in a museum – they constitute a 1903 Mackintosh building that is still serving food and tea to the public.  Below are pictures of these rooms as they looked in 1905;

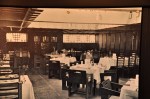
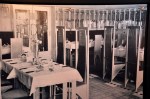
and here is how those first two rooms above – the Front (ladies’) and Back (men’s) rooms – look today.

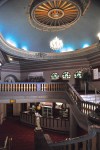
That last archival picture from 1905 (3rd picture, above) shows the “Room de Luxe” that overlooked the street below; it was the more extravagant and exclusive ladies’ room – a “fantasy for afternoon tea”.  Below is how it looks today; the chairs are reproductions, but

the decoration is original.  It really is exquisite – I don’t think I captured it so well – but it is missing at least one of its artistic highlights, one of Margaret Mackintosh’s more famous works, a gesso panel inspired by a sonnet (Rossetti’s O Ye, all ye that walk in Willow Wood).  It’s currently in the Kelvingrove Art Gallery that we’ll visit in the next post, but I’ll include it here where it belongs.  I think it’s gorgeous.  The story of Willowwood

is as follows:  A man sits by a well in Willowwood.  As he looks into the green waters, his reflection changes into that of his dead beloved.  As his beloved’s gray image fades, he scoops at the water with his hand to drink and grieves over his loss.

One last topic – the Tenement House.  Urban working-class Glaswegians lived in tenements, multi-storied flats often consisting of just 2 rooms and a shared outhouse. It wasn’t until the mid-1800’s that landlords were finally required by law to supply water to the houses.  The Tenement House was built in 1892 and was designed for the slightly better-off, with 4 rooms and the added luxury of its own toilet.  In 1911 a Miss Townsend

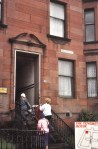
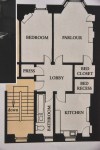
and her mother moved in, and for 64 years she changed nothing.  When Miss Townsend died, a relative came to collect a set of chairs from the will, and “felt like Pip on witnessing the room of Miss Havisham in Dickens’ Great Expectations“.  Ultimately the National Trust of Scotland bought this otherwise ordinary row home as a time-warp display of life back then.  Alas, photos were not allowed; these pictures come from their booklet.

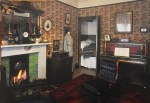
Heating and cooking were done with coal, and the all-purpose kitchen shared laundry duties – notice the wringer on the sink in the first picture below.   Clothes were

dried overhead in this, the warmest room.  Ironing was done on the kitchen table using the flatirons heated on the range, as shown above.  Larger laundry loads were washed in the communal wash house outside.

That’s enough for now, don’t you think?  Next post: Glasgow II, Kelvingrove Art Gallery.


Leaving New Zealand – and a salute to the lovely Ruby Bay

We’re leaving the Tongariro National Park and making a bee-line for Auckland (it’s not our favorite part of NZ, but it’s from whence we must, alas, depart).  This trip back was particularly interesting because, inadvertently, we wandered through what must be life lived within a cloud.  Not exactly heaven-on-earth with harps and all that, but certainly a ghostly, atmospheric world.  If you lived here, however, it must be both atmospheric and an absolute royal pain in the patootie.  I confess I’m surmising here, but I’ll bet I’m right.  I showed you these interesting pictures in the previous post (October 16, 2014; Tongariro Alpine Crossing – My NZ Highlight):

The first picture is from our hotel Chateau Tongariro, in the evening, the second from the volcanoes of the Tongariro Alpine Crossing the next day.  On both days one sees a valley absolutely (and picturesquely) submerged in clouds.  So on the 3rd day, on the way back to Auckland, what do we Home on the (green) range in NZencounter, besides the usual NZ rural splendor, shown to the left?  We encounter a valley in clouds.  As shown below, a BIG valley, with clouds going to the horizon in all directions.  As our road goes up and down hills, and we go in-and-out of white, we pass farms in the mist, with farmers working away like all is normal.  Sometimes the air is clear, with a white ceiling; most of the time the cloud swirls around, and the world is in

soft focus, with filtered light, mostly in shades of gray.  It would be interesting to smooze with the locals in a bar about life here, but we must press on.

Finally we are in Auckland, where we sell back our trusty car, donate a bunch of stuff to the Salvation Army, and get ready to depart.  We will miss NZ!  A final look at Auckland, an OK city in an amazingly beautiful country.

…………………………………………………………………………………………………………………

Before I close out this NZ chapter in our adventures, let me share with you again the beautiful Ruby Bay; we rented a house there and lived in it for about 4 months.  It was a bit of paradise!  The (many) pictures below were mostly taken from the house itself.  To us, the views were spectacularly, impossibly beautiful, captivating us each day.  I said above, “share with you again” because I have already shown you other amazing views of Ruby Bay (Feb 17, 2014; “Receding hills, view from Ruby Bay balcony“).  These are all new pictures, and I could easily – oh, believe me! – easily have included twice as many, and more!  Of course the pictures below are more than any sane person would want to see (they’re for us), but look at a few – and be amazed, like we were.  Ask why we left (they made us!).  The pictures are categorized by view from our house, looking in different directions at different landmarks.

The Islands In The Distance

The Mountain Across The Bay

The City of Nelson, Across the Bay

Rabbit Island, Nearby

Sky and Ocean

Good Bye, New Zealand!  We miss you!

Next stop: The UK

Tongariro Alpine Crossing – My NZ Highlight

We’re off to visit Tongariro National Park up in the mountains.  Volcanic mountains.   I’m particularly interested in the Tongariro Alpine Crossing, regarded as NZ’s best day hike – and certainly its most popular.   Although it’s a day hike, it’s a long one – 12 miles in length with a 2400 ft elevation change.  You get dropped off at one end and picked up at the other, so you have to complete the climb in the allotted hours.  At this time of the year, however, the hike is iffy – it’s dangerous if you’re caught on the trail in a storm, and all but impassable in snow.  We’ll see what it’s like when we get there.

To get to Tongariro National Park we swing by the southern part of Lake Taupo, NZ’s Lake Taupo on a cloudy day.  The lake is huge, an approximately circular inland sealargest lake (it’s huge).  I showed you this lake before (Nov 6, 2013; Rotorua – Geothermal Wonderland).  If you remember, this enormous lake used to be a monster volcano that massively blew in 186 AD, blackening the skies of China and turning the sky of Rome blood-red, half a world away.  The fact that this huge lake is a caldera is astonishing.  The Tongariro National Park is located in this same area of intersecting tectonic plates, and its (much smaller) volcanoes have erupted regularly.  The Tongariro Alpine Crossing traverses this region of active volcanoes, one of which played the part of  Mount Doom in Lord of the Rings.

We’re staying in a fancy place at Whakapapa Village (an interesting name – NZ uses the Chateau Tongariro, with Mt. Ruapehu in the backgroundMaori pronunciation for names, and “wh” is pronounced as an “f”).  We’re at the Chateau Tongariro, a very elegant heritage hotel built in 1929 in Great Gatsby style.  It’s fantastic.  That mountain in the background is Mt. Ruapehu, a ski destination in wintertime but also an active volcano (recent eruptions in 1995, 1996, & 2007 – occasionally emptying its crater lake down the mountainside).  The volcano is best seen from the other side, shown below.  The absence of Mt. Ruapehu’s top is impressive, yes?Mt. Ruapehu, an active volcano and ski slope

The interior of Chateau Tongariro is as elegant  as the outside,  with attentive staff to make you comfortable (“Would you like me to start a fire in the fireplace?  A cup of tea, perhaps?”).  High tea in that interior was a treat, and of course there’s a bar right there.  You feel rich just sitting in one of those chairs.  This Chateau is in the middle of nowhere, mind you, so keeping it going is an amazing feat.

It’s competing with hostels with bunk beds, so maybe that helps.

The view from the Chateau is amazing.  A wide expanse of lawn leads your eye to gentle hills and picturesque mountains, with Mt. Ngauruhoe (Mt. Doom) looming  in the background; at sunset, this magnificent scenery is painted in gorgeous shades of pink and orange.  Wow!

Just before we arrived here, the Tongariro Alpine Crossing was closed, the tour operators no longer operating their drop-off/pick-up service due to heavy snow, and subsequently rain and fog.  In the height of the summer season, the Alpine Crossing is packed, with up to 700 people per day crossing in conga lines from both sides, but this is an iffy time of the year and the crowds are gone.  Since I don’t have winter clothes or crampons with me, Ginger is not going to let me take this hike unless the weather is perfect – and guess what – the weather is perfect!  Most of the snow is gone, the route is clear, and the ranger says I should have no trouble, especially if I wear Ginger’s tights (temperatures are below freezing).  Whoopeeee!  So off I go!  Ginger will hike the nearby trail to Taranaki Falls while I’m doing my thing.

Start of the trail, soon after the car parkI decide to take the 2nd departure at 8am rather than 7, when the temperature will be warmer – but I’ll have an hour less to make the hike.  Still, at an estimated traverse time of 6-8 hours, and pick-up at 3pm and 4pm, I should be fine.  We start out with the sun rising behind the mountains, so we’re in shadow; frost and snow is here-and-there.  Notice how flat the trail starts!  I am not deceived.

The trail is actually flat for quite a while, but then takes off steeply.  A waterfall comes into

view; it may not look like much in this picture, but it’s deceiving – those rocks at the bottom are about people-size!  Mt. Ngauruhoe looms ahead; in the other direction, Mt. Egmont (Mt. Taranaki in Mauri) “peaks” (pun) over the hill from the distant Egmont National Park.  Yep, Mt. Egmont is a volcano too, classified as “active but quiescent (last eruption, 1755)”.  It has it’s own movie fame as the backdrop to The Last Samurai.

Looking back at the car park, left end of the far ridgeWe’re still going up steeply.  Notice how wonderful/ functional the trail is!  I’ve made good progress – the car park is visible at the end of that middle ridge to the left of the people.  Speaking of people, I expected to be pretty lonely on the trail, and I am not!  As it turns out, with the bad weather, hikers holed up for a week and now everybody is out while the hiking is possible.  It’s not crowded, mind you, and having some company is nice.

It’s still quite frosty in the shadows, as you can see on the plants and the smooth old lava flows.  The frost makes the interesting vegetation even more attractive.  I’m now pretty much at the base of Mt. Ngauruhoe, which rears up impressively.  I’ve climbed about a 1000 ft in elevation; oh good, only 1400 more to go!

Another waterfall comes into view, and then we really start to  climb.  The vegetation disappears; this is definitely volcano land.

I’m getting higher, and the trail now has steep drop-offs at the edges!  Notice the fog-filled valley off in the distance – I’ll get to that in the next post, stay tuned.

Finally I’m on the skirts of “Mt Doom”, and it is steep indeed.  And pretty much lifeless.  Mt. Doom indeed!  An information board shows the history of recent eruptions, the last one only 40 years ago.

Mt. Ngauruhoe is impressive this close up.  It has a red, angry lip, and small puffs of steam are escaping from the interior.  I would so love to look down the crater of “Mt. Doom”,

but the side trail up is difficult scree, and more importantly, I don’t have the extra 3 hours.  Next visit, right?

I’ve been hiking up this trail for hours now, and due to the bleakness of the landscape I can still see all the way back to the trailhead, ‘way down there!  That is about to change, however; the trail levels out across an older crater called the South Crater, and I’ll soon be

trading this view for new ones.  One last look at the impressive Mt. Egmont off in the distance.

The South Crater is blessedly flat, but I feel a certain uneasiness in this flatness surrounded by crater walls.  There is a clear cognizance that I am walking in a caldera, and in years past this was not a good place to be!  There is no danger, of

course, but funny how my pace has quickened.  Must be the flatness, surely.  And then the trail heads up again, up a crater wall and then along the crater ridge, with new views.

The trail is steep again!  Steep enough that a cable is provided to allow navigation of a narrow ledge.  The picture on the left doesn’t show the steep part; it was scary enough that I was not tempted to take a picture there, survival being foremost in my thoughts.

A look back (above right) shows Mt. Ngauruhoe and a part of the South Crater; the lower right picture shows a piece of Mt. Ngauruhoe behind a sign indicating a side trail to the smaller Mt. Tongariro, the namesake of this national park.  The trail crosses a saddle between Mt. Ngauruhoe and Mt. Tongariro, a peak that I haven’t shown you because it’s less impressive.  But hey, taking that summit is only an extra hour (or so)!  How can I resist??  So off I go, up a ridge, as shown below.

It’s pretty steep climbing, but the overviews at the summit should be worth the effort.  The picture above right presents a good view of the South Crater, giving you a better feeling for how big and impressive it is.  Then, at the summit of Mt. Tongariro, the My favorite picture of Mt. Ngauruhoeworld is at my feet.  This is why I love climbing mountains!  On a clear day, you can see forever, and with pounding heart and amazed eyes you revel in being alive.  The picture to the left is my favorite view of Mt. Ngauruhoe.  Now let’s look around to new views, ones we will be visiting shortly.  First, the Blue Lake.

I plan to have a late lunch there at the lake (carrot reward; works for donkeys, doesn’t it?).  If you look at that notch in the left image, it’s pretty spectacular.  There’s this low-flying “cloud” below the notch (turns out it’s not your normal cloud), and the view beyond is the

very beautiful Lake Taupo.  The view is gorgeous!!  I can see the horizon for most of the 360; the view is probably better than one of those $1 mil Space Shuttle tourist rides.

To get to that Blue Lake, I must first hike past the Red Crater and the Emerald Lakes; sounds colorful, doesn’t it?  I can see some of the Emerald Lakes from here (below right).

Don’t they look cool?  The picture on the left shows the way down … time to get truckin’.

I’m back on the Alpine Crossing Trail again, and apparently walking past the Red Crater,

but the view is confusing; I can’t really see a crater, but those walls are definitely red!  In the left picture below you can see the “mini-mountain” that I have to climb; doesn’t it

look like this is the end of the trail?  Some big monster ate the rest of the mountain?  Any descent looks like it will be steep!  When I get to the top, there is a nice view of my lunch site, the Blue Lake, and Lake Taupo behind that.  Gorgeous!  But concentrate: we’re going very down-down, quickly, to the Emerald Lakes.  As you can see in the pictures below, the

Emerald Lakes are stunning – and the trail (indicated by the people on it) seems more fit for lemmings.  The trail isn’t quite vertical, it’s more like a playground slide; it’s really steep, mostly sandy – a black sandy pumice – and there seem to be 2 choices to get down; going extremely slowly, which most people are doing, sometimes on their butt (this seems to be a collection point for people, it’s crowded), or falling/sliding/skating at great speed (involving some dodging).  Either way, a lot of people are falling, so why go slow?  Well, I only fell once, probably par for the course; broke the plastic protector over the viewing screen of my camera – happily, no real harm done.

I’m now at the Emerald Lakes, and they’re really pretty!  As shown below, they exhibit a

variety of shades of green within the same lake, along with other colors like yellow and blue.  Notice the steam coming from behind one of the lakes, top right picture; it’s proof we’re on a volcano, with Smaug under our feet!  The bottom right picture shows one of the steam vents.  Pretty cool!  Anyone for spelunking?

Leaving the Emerald lakes, the trail goes up and provides a great view of the lake and the broad vista beyond.  It’s a very beautiful area!  Turning around, I finally see enough of

the Red Crater to discern that it is a crater.  That last picture also shows the sliding-path down, which you might notice is very steep and downright vertical at some spots.

Once again I’m hiking across a caldera in volcano land – this one called the Central Crater (below).  There is a creatively named North Crater, which you can see in the first picture of the Blue Lake that I showed earlier, but the trail doesn’t go across it.  The

trail then goes up to the Blue Lake, pretty steeply, but the elevation affords a spectacular overview looking back.  Look at those volcanoes all lined up in the picture on the right!  The snow-covered peak behind Mt. Ngauruhoe is Mt. Ruapehu.  It’s pretty clear where those tectonic plates are intersecting!

There’s not much view from the Blue Lake, other than the Blue Lake itself, but it’s pretty enough!  The lake is not just blue; like the Emerald Lakes, the periphery of the Blue Lake

is a variety of colors.  Lunch here is a nice respite.  In addition to water, I’ve been carrying a Coke, and with lunch it tastes oh so very good!  Must be the sugar.  From here on, the trail will be all downhill – that’s the good news.  The bad news, I’m not too much more than half-way across the Alpine Crossing.

Leaving the Blue Lake, the trail goes to that notch in the mountains I pointed out from the

top of Mt. Tongariro.  That low-flying “cloud” is still there, below the notch.  And it’s a pretty active cloud, being blown around a bit; swirling, really.  Eh, what?  I’ve been in lots of clouds in mountains before, but it’s always been more of a creeping nebulous fog that surrounds all; not so well defined and discrete as this one.  Walking further,

with the cloud still ahead, a sign portends the answer.  Another volcano?  Haven’t I left them?  Around the next bend I am suddenly confronted by a mountainside going Vegetation everywhere, as far as the eye can see; cloud in backgrounddown, seemingly forever, and covered in colorful vegetation – not your volcano scenario.  It’s a looooooong mountainside, with amazingly long switchbacks terracing into the distance.  The switchbacks go towards and then away from the cloud; sometimes the wind blows the cloud over the trail.

Still, the source of the cloud remains a mystery, until I encounter this sign, below left; the cloud must be steam escaping from somewhere, but there is nothing remotely resembling

a volcano here.  On a long leg away from the cloud source there does come into view a bleak area of the hillside that is emitting steam from small fumaroles, but it’s not much, and that steam just vaporizes into the air.  However, on the long return toward the cloud, the wind shifts up the mountain and the cloud source is revealed.  It’s still far away, but the side of the mountain is really smoking!  As I get closer, steam is absolutely pouring from a large ravine in the mountain, with a long string of fumaroles venting from along the

top of the ravine.  A very lifeless ravine, may I add.  What is coming out of this volcano is steam, forming a harmless cloud that we walk in and out of multiple times.  But I can imagine, in more exciting times, that the steam could be gray ash, and we can’t breathe, and retreat is impossible.  I’m very happy that this mountain is a sleeping dog!

I’ve actually been running down many of these switchbacks; the distance markers suggest that I could make the 3pm shuttle if I hurry; otherwise I’ll have the better part of an hour to wait.  However, the view from the trail is not bad!  So I stop to take some pictures.

The active volcano (fumarole) regionThis is a last look back at the cloud generation.  It’s a lot of steam!!

Finally I’m finished with the switchbacks and long mountainside, and into forest primeval.  The occasional markers giving distance to the car park say I can still make it by 3pm – really, I should have been closer by my reckoning – but as I run/walk down the trail, and the time marches along, it looks like it’s not going to happen.  The markers have lied!!  Ah well, the forest is pretty.

In discussions with others at the car park, waiting for the shuttle to show, there is universal agreement that the markers showing distance were very misleading.  I will close Silver fern, iconic symbol of New Zealandwith a picture of a silver fern, the iconic symbol of NZ.

What a fabulous hike!


Leaving NZ – Revisiting Marlborough Sounds (and Hawke’s Bay)

Snow on the mountains; view from our Ruby Bay houseIt’s getting rather cold, now that it’s autumn (end of May); this picture was taken from the balcony of our house in Ruby Bay, looking in the direction opposite the bay.  Snow on the mountains.  And, alas, time to leave NZ.  We’ve gotten 3 email reminders from Immigration that our time to leave is fast approaching (efficient, that office).   So we’re off to Auckland to sell back our car.  We get to do the Marlborough Sounds/Cook Strait ferry trip again – hopefully in sunshine this time – but our primary aim on the way back to Auckland is to see the Tongariro National Park – and maybe hike the Tongariro Alpine Crossing, the most popular day hike in NZ.  We’ll see; it’s pretty iffy this time of year, when snow can make it impassable.  Oh yeah, and we’ll visit (or revisit) some wineries on the way back – why not??

We finish cleaning the house, pack everything into the car, and head off to Picton to connect with the ferry.  We’ll be making the same trip between the North and South Islands that we did in December, but in reverse.  That first trip was made through the middle of a fog bank (Dec. 12; “Marlborough – The Sound, The Wine“). Hopefully this time will be different!  As we pull away from Picton, early early in the morning, we are greeted by bright sunshine fore and aft.  All Right!!!

The water is calm, the temperature cool, the air crystal clear; it’s a perfect morning.  We’re navigating the same Queen Charlotte part of the Marlborough Sounds as before, but the view is strikingly different from our earlier trip; the view of the mountains meeting the water is very pretty, but it’s missing the atmospherics of the fog that I had so decried on our first trip.  Below are pictures from along the route.  At one point Ginger finds me (it’s a big boat!) to that say there are dolphins playing in our wake; alas, when I get to the stern they are gone.

Suddenly, around a bend (there are many bends!), I can see a clear demarcation in the water; we are about to enter Cook Strait, and our calm water is going away!  Pretty dramatically!

Oh yeah, there is a (pardon the pun) sea change in the water!  The waves are crashing on the rocks, and this big lumbering boat is swaying pretty hard.  Perhaps in the upper right picture below you can get a feeling for the large swells, although it feels much rougher than it looks in the picture.

There are some very pretty views to be had as we pull away from the South Island, and these help take our minds off the rolling ship.

The middle of the Strait is pretty uninteresting unless you like to count the swells rocking the boat.  Some of the passengers soon take to fresh air, hanging over the railing, but we’re good.  Ginger took a Bonine before boarding, and I buy a ginger beer as therapy.  A couple of rocking hours later we approach Wellington and its bay on the North Island, and the water becomes both calmer and prettier.

We showed you Wellington before (Dec 5, 2013, “Wellington City and WOW!”), so I’ll just On the road to the Waipara Valley - and wine!end this section with a shot of the beautiful mountains (and winding road!) on our way to a quick stop in the Martinborough wine region.  We plan to have lunch there and revisit a couple of our favorite wineries.  We can’t stay long because (1) I’m driving and can’t drink much, and (2) we’re due in Napier where we’ve scheduled a few days to further explore wineries in our favorite wine region, Hawke’s Bay.  Work, work, work!

……………………………………………………………………………

MARTINBOROUGH AND HAWKE’S BAY WINES

We covered these wine regions in a previous post (Dec 6, 2013; “Napier, Hawke’s Bay, and … Martinborough?“).  Martinborough is not small, it’s tiny; but they do have some wonderful wines.  They’re almost on the way to Napier and Hawke’s Bay, so the small detour won’t cost us too much.  One of our Martinborough favorites, Murdoch JamesBesides, we really want to revisit some of our favorites.  Alas, Coney Wines was closed, but we did find Murdoch James open.  Yummmmmmm!  Fortified Pinot Noir may sound weird, but it’s really good!  Then off to Hawke’s Bay.  The wineries here are spread over a large area, and we missed a lot of them the first time through; but we’ll make up for that now!

Map of Hawke's Bay WineriesAs you can see from the map, the wineries (the small numbered squares) are scattered over a large area.   Intervening cities and the distance between wineries make it hard to visit very many in a day.  The first time through we concentrated on the northern ones (as well as sight-seeing in Napier), so didn’t cover much territory – but we loved what we covered!!  This time we’ll concentrate on the more southerly wineries.  Alas, there’s no way we can do them all; next trip, right?  Below are pictures of a couple that we really liked  – Alpha Domus and Elephant Hill, and below that the elegant Craggy Range.

Some of our favorites are shown below, but we shouldn’t forget Black Barn, and certainly not Church Road.

Next post, Tongariro National Park – for me, the highlight of our NZ trip!

Revisiting Nelson Lakes, with company

Brian and Janaki, Mt Roberts to the rightI’ve shown you Nelson Lakes National Park before (post of Dec 29 2013, “Nelson Lakes National Park“).  It’s a pretty area, nestled at the northernmost limit of the Southern Alps and serviced by the sleepy village of St. Arnaud, population 100.  This time we are revisiting with company – similar to our last post on Abel Tasman National Park.  First to visit is our son Brian and his girlfriend Janaki.  When last we were here, Ginger climbed the challenging Mt. Robert (that mountain on the right), a 2,000 foot ascent up the Pinchgut Track, correctly labeled “steep”.  Due to the lateness of the day and impending clouds, on that climb we had backtracked down the Pinchgut rather than complete the slightly longer 6 mile loop.  This time we plan to do the reverse climb, doing the 6 mile loop and only going down the Pinchgut.  Alas, when we get there, that trail head has signs saying it is temporarily closed.  Rats!  So off we go, once again up the Pinchgut.

What makes the trip more interesting for us is that Janaki, bless her heart, has never hiked up a mountain, much less one that’s a hard 2ooo feet up.  The path starts gently, but rapidly turns into a series of steep switchbacks.  Early on, Ginger realizes that this is not her day to hike and decides it would be wise to turn back, particularly since she’s done this hike before.  The rest of us continue on,  but as we look out from the trail, we discover that the high clouds (visible in the first picture) are not quite so high anymore; they’re lower, and they’re coming our way.  Nooooooooooo!

We keep climbing, and the clouds keep lowering.  As you may remember, the trail goes in and out of the woods, but when it comes out, the view below is increasingly and disappointingly obscured.  Janaki, however, is doing great and is plowing uphill just fine,

in spite of the impressive incline.  The view is crap, but the kids are enjoying being inside a cloud.  OK, but what about the view you’re missing?

Janaki and the view (or lack thereof) from the topFinally we clear the woods for the last time and shortly we’re at the plateau top.  Yeah, the loop continues up a little further, but what’s the point?  The view won’t change!  So back down the Pinchgut we go, still stuck inside that darn cloud!  I’m grumbling in my beard, but the kids still think being in a cloud is cool.

Just two final photos: the view back at the trailhead, with victorious climbers Brian and Janaki; and the view of the lake and the mountain from St. Arnaud, showing Mt. Robert being sat on by a cloud – which, on the right side of the mountain, funnels right down the Pinchgut track!

Those clouds are just mean!

………………………………………………………………………………………………………………………………………………………………………………………………….

The trail in a pretty birch tree forestNext to visit Nelson Lakes is John Chang, our California friend.  This time we’ll climb the mountains on the other side of Lake Rotoiti, the St. Arnaud range; it’s a tougher climb, a longer and higher up-and-back.  A disadvantage of this climb is that, unlike Mt. Robert where the trail goes in and out of the woods, offering panoramic views as you go (if you’re not inside a cloud), this climb is all woods most of the way until you finally emerge onto treeless tundra.  At the start the trail is pretty smooth and gentle, and the birch forest is beautiful.  Soon, however, the trail heads up – rather steeply – and becomes rough, peppered with rocks and roots.

On the rocky outcrop with a view of Mt RobertsWe finally clear the forest – we’ve been working hard! – and not far away is a rocky outcrop with a view.  This is the turn-around point for many climbers, and we decide to stop here for our well-earned lunch as we catch our breath and cool our heels.  It’s a pretty view, Mt Robert and Lake Rotoiti in front of us, and the valley heading north off to our right, as shown below.

The view up from our rocky outcropWe, of course, will not be deterred from reaching the top.  No wimps, we!  You will note, however, from the picture to the side, that the terrain is wickedly steep.  We’ll actually be climbing up the mountain to the left of this picture, but it’s no less steep!  The picture below shows some pretty flora on the mountainside Pretty plants on the mountainsideas we hike up – I’m taking pictures of flowers, not catching my breath, honest!

Going up the steep incline, we occasionally stop and turn around to catch the increasingly awesome view of our stoney outcrop, Mt Robert, Lake Rotoiti, St. Arnaud, and the mountains in the distance.Half-way up the steep part

Near the top it gets really steep (it wasn’t before?) and we have to use our hands as well as our feet to go up; we’re crawling!  And then we’re there.

It’s bloomin’ Awesome!  Unlike Mt. Robert, this ridge top is sharp, so there is a nearly 360º view – including the other side of the mountain that we have never seen.  To start off, let me show you the view you’ve been seeing, that of Mt. Robert.  Note in the foreground that it looks like you’ll fall off a cliff if you take a step forward.  Yep, the climb up was steep!  The trail continues at a right angle along the ridge, but that must be for hikers spending the night somewhere.  We’re

happy not to be going further!  Pictures can’t capture the whole gorgeous scene, but I’ll show you a few.

A strange plantSome of the plants up here are pretty interesting – for example, this thing growing on the rocks.

Time to go back down, and Surprise!  Going down that steep part turns out to be more of a challenge than going up!  The pictures below don’t do the steepness any justice – pointing the camera downhill flattens the terrain.  We find that walking this section is impossible, sliding is not a great option, and the only thing that works is to sidestep/slide/fall without a lot of control, heading toward a big rock or clump of grass (hopefully anchored) to stomp on to arrest the downward momentum.  It’s more tricky than it sounds, and – ah – not always successful!

One last view of Mt Robert and Lake Rotoiti from above, and the tough trail going down.

We are, in fact, getting very tired navigating the hard trail, which is more step down and jump than walk a path.  Our legs are getting shaky and threatening to cramp, but The St Arnaud range; we hiked up the middle foldwe finally make it back, tired but happy.  Our hike took us up the middle fold of that St Arnaud range – reasonably impressive, yeah?

A final look at lake Rotoiti – and one of its inhabitants, an eel.

Next post – leaving the South Island.

Abel Tasman National Park

You may remember that, early in our sojourn on the South Island, we traveled to the west side of Abel Tasman National Park but only hiked a piece of one of the inland trails due to Ginger recovering from back issues (Dec 30, “Abel Tasman National Park and Golden Bay“).  We had no real views of the beaches that Abel Tasman is famous for; now we intend to do better!  This time we’ll approach the park from the east, take a trip by sea kayak, and hike the seaside trails above the beaches.  Abel Tasman is NZ’s smallest national park, and one of it’s most popular, with stunningly beautiful golden sandy beaches, crystal-clear water, lush green bushland, striking granite outcrops, and an abundance of wildlife.  Sounds good to us!  It is also only 20 miles away from our house, one of the many attractions that led us to this area.

I’m going to show you this pretty part of the world via three of our trips with visitors: my sister Linda, our son Brian with his girlfriend Janaki, and a good friend, John Chang.

SEA KAYAKING

Kaiteriteri beach, looking out to the Tasman BayOn our first foray, we take my sister sea kayaking from Kaiteriteri, a small village just south of the Park.  Looks nice and peaceful, doesn’t it?  After a brief lesson we gear up and, just us with guides, head into the park waters.  It’s really pleasant – all the short way to that island on the left, whereupon we enter Tasman Bay and encounter wave swells higher than the kayaks!  We’re going to Split Apple Rock, about an hour’s paddle away, but how to get there is an issue – we need to take the waves head on, but heading directly toward Split Apple Rock  Split Apple Rockputs the kayaks broadside to the waves; so we compromise and make an arc, taking the waves at an angle.  Tough paddling!!!  Our outing rapidly becomes hard work!  With great perseverance we make it to Split Apple, and calm water.  It’s a pretty place; the water is a beautiful color; the rocks are interesting; and we get to paddle through a small cave.

Then it’s time for a well-deserved lunch break, and we land at a nearby gorgeous beach.  Look at that water!

Groan, now we have to kayak back!  Thankfully, the waves and wind actually help us on the return, but the quiet bay is a welcome end to the trip.  In spite of waterproof jackets and kayak skirts, we find we’re thoroughly drenched; our muscles ache in places we didn’t know we had, and we’re beyond tired!  We’ll sleep like the dead tonight.  We decide we’ve have had enough of sea kayaking – at least in rough water!

ABEL TASMAN

Abel Tasman has a Coast Track and a number of Inland Tracks, but most people opt for the coastal route with its idyllic beaches.  To do the complete Coast Track  would take 3-5 days, but there are several water taxis that will take you to different drop-off points and pick you up at appointed times at the end of your hike, giving you 6 different choices for day hikes – although several of these hikes are time-critical due to sections of the trail being under water at high tide.  With Brian and Janaki now along, we decide to simply start at the beginning and hike until somebody decides it’s time to head back.

At the start, the tide is out – impressively ‘way out!  The tidal flats keep going, and the Tasman Sea is off in the distance, resulting in interesting bands of color.  I can picture

us lounging on that sandy beach and wading in the rivulets of that ephemeral land, but there is more to see that beckons us on. It’s tempting, though!

The tail is relatively flat and easy – and attractive, often with a view of the water and

Pretty beach beaches.  We explore some of the beaches, and then choose a pretty one to host our lunch.  Although the trail itself is easy, getting down to some of the beaches is a bit of a challenge.  There are paths going to them, but they’re invariably steep; definitely worthwhile, though!  We are sharing “our” beach with a handful of other people, but it’s such a big, long beach that we feel as if we have it to ourselves.  Nice!

It’s really beautiful!  The sand is wonderful, the water gorgeous, the beach comes with caves and rock formations to explore, and there are picturesque islands and mountains in the distance. The large rocks make nice tables and chairs; the view is hard to beat.

Further down the beach are some quite pretty shags that are not at all afraid of me; one tells me that I’m trespassing, in no uncertain terms.

Islands in the bay


Back on the trail again, we wander a bit further, with more views of beaches and islands offshore.  Then, alas, it is time to turn back.


Next to visit us is a friend from California, John Chang.  Before going back to Abel Tasman, we of course had to visit a few nearby wineries – consider it fuel for the hike!  Maybe you notice that life isn’t bad here?

We have a habit of not being early risers, and this time it bites us; when we arrive at the Abel Tasman water taxis, we’ve missed the outgoing trips to parts unknown.  The only option is to start hiking from the beginning of the trailhead again; rats!  But this time we’ll go further, and zoom past the early regions.  The repeat trip is still pretty!

Beach with a viewIt’s a cool, cloudy, windy day (it’s early autumn here), and there are not many people on the trail; the golden beaches with their crystal-clear waters are deserted.  We find a beach that’s big and looks gorgeous from up above.  It’s quite a scramble down the steep path – coming up will be a struggle – but it’s worth the effort.


Beach flowersWe even find a patch of late-blooming beach flowers before we scramble back up to the trail.  It’s getting late, though, and time to head for home – with maybe a stop at a local pub for a thirst-quencher.  Hope you enjoyed this part of Abel Tasman.  Our only regret is that we weren’t able to spend more time hiking in this beautiful park.

Next post – back to Nelson Lakes National Park!

Haast Pass and the Fox and Franz Josef Glaciers

We’re making a mad (long) dash between Queenstown and the West Coast’s Fox Glacier, so there’s not too much time to observe the sights along the way – short hikes only.  We will take a last look at Queenstown as we leave it.

Note the landing strip in the last picture, which you saw in the video from the previous post (June 24, “Queenstown, Arrowtown and the Routeburn“).  After leaving the mountains, the road passes the pretty Lake Hawea and the northern part of Lake Wanaka.  As usual, New Zealand’s water/mountain/cloud combos are special – a visual treat.  Lake Hawea pictures are below.

Lake WanakaTo the left is a view of the northern reaches of Lake Wanaka (I showed some of its southern parts in an earlier post – April 7, “Wanaka and the Rob Roy Valley“).

HAAST PASS

The Haast Pass goes though the upper regions of Mt. Aspiring National Park (visited in the Rob Roy trip mentioned above).  It’s a pretty area; the road follows an old greenstone trading route and the cascading Haast River.  We take time to do some short walks, such as the Blue Pools Walk below.  Note how unbelievably clear the water is!  We see large fish (not shown) that seem to be practically swimming in air.

Another short walk was to Fantail Falls.  Yes the waterfall is pretty, as is the associated stream-in-a-hurry, but look at the river rocks!  Even the rocks in NZ are gorgeous!

We also visit the impressive Thunder Creek Falls.  Again, there are attractive veined rocks.  The surrounding forest wasn’t too bad either.

We finally arrive at the stormy West Coast and make a beeline for Fox Glacier.  As I noted in an earlier post, the West Coast is stormy and wet, getting 12-30 feet of rain a year.  It is not sunny today, and one can certainly tell which way the wind blows!

FOX GLACIER

Brochure picture of Fox GlacierWithin a few horizontal miles the terrain drops from 10,000 feet to a rain forest just above sea level, and both the Fox and Franz Josef glaciers creak down the steep incline at world-record pace, aided by the snow pack on top getting about 120 feet of new snow each year.  It should look something like that picture to the left, but the sky is all swirling cloud, visibility is limited, and we’re behind a mountain.  What we do see from afar is impressive enough, though!

We learn that it is supposed to rain tomorrow; if we want to see the glacier, now is the time (and it’s getting late).  So off we go.  The glacier has receded nearly 2 miles since 1750, and that’s the walk ahead of us.

As we slog along, we are greeted by a number of small waterfalls and creeks coming down from the mountains.

Again, the rocks along the trail are veined and beautiful!  Even the little pieces of gravel are too pretty to resist taking a piece home.

We arrive at trail’s end and find that Kea (alpine parrots) are already there, trying to help us get closer by untying barricade lines and eating warning signs.  Two of them are working the warning signs together, one trying to eat it from the top, one from below.  They really seem to be gremlins, disguised as pretty birds.

As it turns out, we can’t get very close to the glacier – two teenagers were recently killed when pieces broke off and buried them (they’re still there, impossible to retrieve).  The glacier also makes a right-angle turn, and we can only see up to that point.  Still it’s impressive enough, and pretty as the sun sets.

Nothing to do but hike out in the increasing gloom – and gather pretty rocks, of course.

One last look back, from a higher vantage point on the way out.

The weatherman got it right, and the next day it’s raining.  I had wanted to do a Glacier walk, picture from brochure guided 4-hour glacier walk, such as shown in this picture from a brochure, but we are short on time, the ladies are far from enthusiastic, and the rain clinches the “nope”.  Instead we’ll do the popular Lake Matheson Walk, with it’s iconic view of Mt Cook and Mt. Taman reflected in its water.  Or in our case, the reflected rain clouds?

In spite of the drizzle, it’s a lovely walk, with mountains in every direction.

Then it’s into the woods to drip our way through the ferns and mosses.

As shown in the first picture below, the “iconic view” of Mt Cook and Mt. Taman is not reflected in the lake today, alas.  Near the end of the walk the rain clears briefly, and we do get a reflection; just not of the big mountains.  Still, it’s worth the price of admission.

FRANZ JOSEF GLACIER

The walk in to Franz JosefFranz Josef is nearby, so we’re there quickly, and the rain has come with us.  We start the hike to the glacier, and discover there’s a benefit to this wet stuff; there are a lot of waterfalls along the trail, and nice ones at that!  They’re not huge waterfalls, but hey, I’ll take small and picturesque!

A wall of waterfallsFurther along the trail we encounter a region with a multitude of waterfalls cascading down the cliff face.  Although most of the waterfalls come prettily in and out of view on their way down, the falls on the far right remains in sight quite a distance and is impressive indeed, as shown in the pictures below.

As we hike further in, the dark cliffs and gray skies become a bit forbidding if not downright sinister.

Another waterfall or two, and then we’re there.

We are looking at one BIG front of ice!  It’s very impressive.

Surprisingly, some of the clouds suddenly clear, and we have patches of blue sky!  How about that!

On the way out, we see another waterfall that was hidden behind one of the cliff walls.  Also some cute wildflowers.  As the sky clears – which it’s doing quickly – the force of the wind up there on the top is revealed in the sweeping curved sculpture of snow peeking above the mountains.  It may not be friendly up there!  We pass again the twin waterfalls shown earlier, still very pretty.

Looking back at the glacier and scoured valleyFinally, a look back – in sunlight! – at the glacier with its scoured-out valley and waterfalls on both sides.  Hopefully you’re impressed!

Oh, and one last picture below of snow on a mountain top, with an appealing shape.  Snow on the mountain

The next day, it is time to head “home” to Nelson.  Below is a last shot of this pretty area of Franz Josef – and just for good measure, a picture of the ladies enjoying sculpture on the beach in Hokitika (notice the crashing waves in the background!).

Next stop – back to the Nelson area, and Abel Tasman National Park.

Queenstown, Arrowtown and the Routeburn

QUEENSTOWN

Ah, Queenstown.   It’s one of NZ’s best-known destinations, and it’s certainly Queenstownthe country’s premier commercialized resort town.  It’s also beautiful, nestled at the base of mountains and looking across gorgeous Lake Wakatipu to the craggy Remarkables range (see image from the internet to the left).  You might enjoy a pilot’s video of the area as he lands a small plane at Queenstown airport.  The link below will open the video in a new window – it’s about 4 minutes long.  http://www.chonday.com/Videos/pilotnewzdalnd1.

Quite a location, but we thought the city itself was a flawed jewel, at least for old fogies like us: it was crowded, touristy, and filled with stores heavily marketing every adrenaline-fueled activity known to man.  It’s a place for young people with a lot of  money to spend on flying, falling, floating, speeding events – and the price for each was hundreds of dollars.  Ginger wasn’t really keen on any of it.   So we took a pass on the adrenalin rush, and went instead for the surrounding beauty:  the Routeburn track and a visit to historic Arrowtown.  In this case “we” is three of us; my sister Linda, from Albuquerque, joined us in Queenstown and will travel with us for awhile.

First, some pictures of the area coming into Queenstown.  It’s austerely beautiful.

Next a few pictures from the Queenstown shore.  The last two pictures show the same scene under different light – always amazing how different the colors are on different days.  The light is somehow special in New Zealand – a painter’s light, often with a golden glow.

While we’re discussing Queenstown and light, let me show you some views from our apartment as the sun starts to set.  It was pretty nice.

ARROWTOWN

Miners' cottages, Avenue of Trees, ArrowtownArrowtown, only 10 miles from Queenstown, was born when gold was discovered in the Arrow River in 1862 – lots of gold.  One of the early prospectors was able to keep his lode secret while recovering 200 lbs. of the stuff.  The area became known as the richest for its size in the world, and at its height it was a town of 7000.  Today the population is 2400, surviving on the tourist trade and doing quite well.  It’s a nice-looking New Zealand town, with one of its highlights being the Avenue of Trees shown above.  Those trees were planted in 1867 along the line of tiny miners’ cottages that have been preserved.  More views of the town are shown below.

One of Arrowtown’s claims to fame is its Chinese history.  After a few years gold became harder to mine, miners left for newly discovered gold fields on the West Coast, and Arrowtown was left with businesses but few customers.  The solution was to import Chinese to the gold fields – as stated in the local newspaper, “An increase in population, even were it in the shape of chimpanzees, would be preferable to no population at all.”  By 1870 there were 5000 Chinese in Arrowtown, living in a segregated community, forced to work abandoned mining claims or the tailings of European miners, or working for half what a European earned.  Despite the racism, the Chinese were known for their “sober, upright and straightforward” conduct.  Arrowtown has the best preserved Chinese community in New Zealand.  Ah Lum's Store The best preserved building is Ah Lum’s store, built in 1883.  Ah Lum was literate in English and became a pillar of the Chinese community; his store sold both European and Chinese goods, operated as an opium den, and was a bank for the Chinese.  The loft also provided accommodation for travelers.  The compact floor plan, and an interior area, are shown below.

The (restored) Chinese miners’ huts are incredibly small, intended as temporary structures, with tin, sod, stone and timber the principal materials.  The huts became permanent as the miners aged and were unable to return home.  Pictures below.

ROUTEBURN TRACK

Linda and Ginger at the trailheadIf you remember, we “did” the Routeburn Track in a previous post  (April 20, “Leaving Milford Sound – the Routeburn Track to Key Summit” [clicking on the title will take you there in a new window]).  “Did” meaning we climbed part-way up one end of the trail.  Now we will go part-way up the other end of the trail – unfortunately leaving unseen the really, really pretty part in the middle.  Alas, such is the sad fate of those unwilling to carry heavy backpacks for days.  Still, the trip promises to be pretty.  The Routeburn is one of NZ’s Great Walks, and one of its finest.

Actually, just getting to the trailhead is pretty spectacular!  It’s at the other end of the long Lake Wakatipu, and the lake’s color changes along its length, and undergoes amazing

changes from day to day (that NZ light!).  The head of the lake is even more beautiful, as shown below.  In fact, it’s beautiful enough to have caught the attention of movie

producers, and the area appears in films like The Chronicles of Narnia, X-Men Origins, Lord of the Rings and The Hobbit.

The Routeburn trail at this end goes steadily uphill following the beautiful Route Burn river, which is very clear with a somewhat turquoise cast.

 I love being serenaded by a musical river, so this is a treat!  The trail itself is a regular highway, but a little rocky.  However. it’s sides are very green, covered by an enormous variety of ground covers and moss.  Very large mossy rocks are common, along with some rougher rocks that, typical of NZ, have veins of different materials, making them interesting.

The water coming gallumphing down over rocks is beautiful.

We’ve been walking for a couple hours now, and the ladies need a restroom break.  We’re not the only ones on the trail, so this is a bit tricky, but we find some house-sized boulders close to the trail that will provide the needed cover.  Okay!  Biology attended to!  Off we go, Luxury, just 25 steps too fara whole 25 steps around the boulders, and lo and behold what should we see before our eyes?  Yep, the luxury of a very nice outdoor toilet, the distance from the trailhead almost perfectly calibrated for the needs of a female walker.  Almost.  Maybe 25 steps too far, actually.  How funny was that?

After a bit more we come to a pretty part of the river and the ladies decide they have had enough hiking.  I decide to hike up to the first hut, which should have a nice view.  The trail continues to be pretty, with a forest of ferns under the trees, and a nice beech forest.

The trail opens out to a beautiful meadow, and then I’m there.  I didn’t take a picture of it,

but the hut itself was pretty spiffy.  I’m used to rustic lean-to structures.  This was a four star fancy building, doors and wood bunks and all!  The surrounding meadow is gorgeous, with clear stream, impressive mountains and a waterfall.

As I head back, the Route Burn River is illuminated by beautiful, slanting late afternoon light.  An added bonus, I see several diminutive Rifleman birds.

That’s it!  Pretty but not spectacular.  Alas, the truly gorgeous views are in the middle section that we did not hike, but I am content.

Next stop, the glaciers!

Dunedin – Chinese Scholar Garden, and Polynesia

CHINESE SCHOLAR GARDEN

Chinese Garden bridgeThe Chinese Garden is a recent – and fabulous – addition to Dunedin.  It is one of only 3 Ming Dynasty scholars’ gardens outside China.  A scholar’s garden is the creation of a “spiritual utopia”, a contemplative space, an escape from daily concerns where one can re-connect with nature, the ancient way of life, one’s true self.  The gardens try to capture the look of traditional Chinese paintings and the imagery created in poetry.  To create this authentic garden, its wooden houses and structures were made in Shanghai using 4th century BC techniques – no nails, just mortise and tenon joints.  The granite plinths and facings were hand chipped, the columns free-standing and not pinned.  Terracotta roof tilesThe buildings needed 380,000 terracotta roof tiles, handmade in Suzhou, China.  After being assembled in Shanghai, the buildings were taken apart and shipped to Dunedin, along with 970 tons of rock and 130 tons of granite.  Forty Chinese artisans from Shanghai did the installation in Dunedin.

The Chinese word for “landscape” literally Chinese garden mountainmeans “mountains and waters”, and the mountain built here is from prized Lake Tai rock (from near Suzhou), a rock that represents wisdom and immortality; during the Song dynasty this sculpted rock was the most expensive object in the empire.

We felt this Scholar’s Garden was indeed a wonderful, soothing, contemplative, fabulous place.  By intent, there are visual surprises around every turn and corner (of which there are many!).  Beckoning niches, contrasting colors and textures, or repeating patterns are traps for your eye and give you pause.  Every window has a different intricate and marvelous grating.  Let us take you on a tour.  I’m just going to put a bunch of pictures below, as we walked around.

THE OTAGO MUSEUM – POLYNESIA and MELANESIA

This is a small but interesting museum that covers a number of subjects, but we were mostly Polynesia/Melanesiacaught by the Polynesia/Melanesia wing – we really didn’t know much about the island regions of our world, and since we’re living in one of them, NZ, with Maori inhabitants, we thought we’d take a closer look.  For orientation, here’s a map.  As you can see, Polynesia is ‘way out there, specks floating in a big ocean!

Before starting the Polynesia section, we took a quick look at some very nice Maori carvings that the museum had.  They were made for a meeting house near Napier (North Island), and were carved in the 1870’s.  We’re impressed!

For us, there are two very fascinating aspects of Polynesia.  One is that the islands were settled one-by-one by seafarers using basically a canoe with a sail; these islands are anything but close, so the utter audacity of sailing off into the unknown is amazing.  A sail and a prayer – if not a death wish – for a family or couple!  I can see it now – “Hey sweetie, how about we sail off into that sunset and get away from here?  We’ll find an island just for us.  I mean, how big can the Pacific ocean be?  You bring the water, I’ll paddle.”  Yeah, not sure that pick-up line would work with Ginger.

The other fascinating aspect is the subsequent developmental changes (or their lack!) that occurred from a common culture.  The islands were far enough apart that there was no chance for communication early on and,  like Darwin’s finches, the cultures evolved in isolation.  Alas, the museum does not directly address this topic, but it’s visible in the displays.

Boats of the PacificLet’s start with migration.  Polynesian culture goes back 3 or 4 thousand years in some areas, originating from Southeast Asia and Taiwan.  The far-flung areas we now call Polynesia were occupied by the late 1200’s AD.  The picture to the left shows typical boats from different regions, and mostly they are riffs on the same theme, with a couple of exceptions that I’ll show first.  China is the biggest exception – really not a Polynesian Typical Chinese shipplayer, but interesting nonetheless.  A very different boat!  China had a permanent navy in the 1100’s during the Song Dynasty, with 52,000 marines!  They were the leading maritime power in the early 1400’s, until subsequent emperors lost interest, eliminated their navy, and turned inward.  Their boats had a different purpose (not island hopping/fishing) and thus had nothing in common with Polynesian boats.  The other exception in this display is a Peruvian boatKon-Tiki-like boat/raft from Peru, but there is little evidence that South America contributed much to Polynesia (except possibly to Easter Island).  You may notice from the overall display at the start of this paragraph and in the pictures below that the New Zealand boat is different from most of its cohorts, having no sail and no outrigger.  Its evolution is likely due to the shore-hugging short-distance travel around these large two islands, though sails and outriggers would have been used for the initial ocean crossings.  You can also see that the war canoes of the Solomon Islands were very similar to that of the Maori, including the dramatically upraised prow.  The other boats all have  outriggers or a double hull, many have sails, and all are structurally similar.

Differences in tattooingWe thought the NZ Maori tattooing was extensive!  This painful process was primarily done on Maori males, the females usually just doing their chins.  For the Maori, tattooing was a mark of puberty as well as conveying information on a person’s lineage, tribe, occupation, rank, and exploits.  Well, as you can see in this display, tattooing is obviously a Polynesian thing!  And the Maori were conservative!  Look at the Easter Island women, or the Samoa or Marquesas extensive tattoos (Ouch)!  In these other cultures tattooing was also a mark of puberty, courage, rank and status.

Decorative art such as combs and pendants, shown below, also show similarities across the island cultures, perhaps due to the similarity of available raw materials.  The particular designs used in ornamentation, who wore them and how they were worn, however, varied from island to island.  For instance, the pendants in the case below were decorated clam shells; it’s the same resource, but different cultures wore them on the chest, on the neck, or on the head.

Apparently house construction varied regionally across the islands, but there wasn’t much on display.  I have two for you below, one a picture (New Caledonia), one a display (Samoa).  Samoans were the “Architects of the Pacific”.  Their houses  were built without nails, screws or pegs.  The open sides of the house allowed free circulation of air, but blinds of woven palm leaves could be lowered.  Floors were of stone.

Breadfruit splitters, Marquesas vs Tahiti

Tools had a lot of similarity.  When a particular need would be the same – say, splitting breadfruit – the solution on different islands was usually quite similar, as shown with these breadfruit splitters to the left from Marquesas and Tahiti.


Often differences in tools among the islands were directly related to the availability of raw materials, such as the adzes below in coral, stone and jade.


Not everything is easily compared between islands.  We’ll just show some bowls and interesting tools.

Music and celebrations are universal, as are drums and pipes.

And where there is dance, there are masks.

Finally, of course there is war.  Islands are not an escape; the Maori were a warrior culture, as we have seen in earlier posts.  When it came to war, the Polynesian islands diverged considerably, depending on the political culture.  Some islands became fully developed kingdoms with little warfare, others divided into constantly warring tribes, such as NZ’s Maori.  The primary force driving the culture one way or the other, in addition to population pressure, was geography.  On level islands, where communication was essentially unimpeded, warfare was not chosen.  On mountainous islands, with distinct boundaries like mountain ridges, warring groups were the norm.  How interesting is that!  Below are instruments of warfare, starting with the clubs.

In addition to clubs, there were spears and shields.

Warrior from Tuvalu, an atollAs a last picture, this is a Kiribati warrior from Tuvalu, an atoll.  Atolls, just a few feet above the sea, support very little life other than a few trees and coconut palms (water was obtained from holes dug in the coral).  With so few resources, humans struggled.  However, here is a well-dressed warrior, on an atoll where we have been told warfare is not likely to occur!  We don’t understand the need for armor, but the armor is in itself interesting; the cloth is coconut fiber decorated with shells.  The helmet and stomach guard are of fish skin.  Sharks teeth are used in the weapons. Quite a use of what you’ve got!

Well, I hope you enjoyed that long discourse on Polynesia and its insight into cultural evolution.  My take-away is that if the resources are pretty much the same, the evolution is pretty much the same.  If everyone lives on a flat area with few natural defenses, people make peace (conversely, it there are defensible borders, it becomes us-vs-them).  I also thought it was interesting to get an insight into stone-age cultures existing into the late 1800’s!

Next post – Christchurch!

Dunedin – Architecture and Art

Dunedin is the largest city in the southern half of the South Island, with a population of 120,000 (20% of which are students).  Called the “Edinburgh of the South”, it was founded by Scottish settlers around 1850, who named it after home – DunEDIN(BURGH).  Ten years later gold was discovered nearby, and this port city quickly became NZ’s most important, spurring a building boom that resulted in a legacy of harmonious Gothic Revival architecture fashioned from volcanic bluestone and creamy limestone.  This is a city post – Dunedin’s university, churches, architecture, and art museum.

THE UNIVERSITY OF OTAGO

Dunedin is home to NZ’s first university (1869).  We happen to be here during the University’s Orientation Week, a big mistake!  Classes are not yet in session, and students, newly liberated from parental control, have a lot of time for beer drinking and rowdy behavior. We have unwittingly booked a motel in a student area, our walls are thin, and loud top-of-your-voice street-side “conversations” go on until 3 or 4 in the morning.  Groan!

The University looks very much like an English university to us, although it’s on a considerably smaller scale.  In the pictures below, the darker stone is bluestone.

The details are fun – the carvings, the attractive windows, even downspouts are special.

THE CHURCHES

Every day we walk past this church that is not in our tour books – the Knox Church, it’s called, just a small Presbyterian church – but it is quite beautiful, reflecting the architecture of that time.

The most impressive church in Dunedin is St. Paul’s Cathedral, an Anglican church constructed in the early 1900’s entirely of Oamaru limestone (see post of Jan 20, Oamaru and Penguins).  It’s located on The Octagon, the central plaza of the city, laid out in 1846 and home to a number of well-preserved buildings.

Positively European, eh?  I’m a sucker for stained glass, and this church has a lot of it, all from the early 1900’s.

The final church is the First Church of Otago, touted as the most impressive of NZ’s earlier 19th century churches.  Praise is given to its wooden gabled ceiling and rose window, but we get there late and I am shooed out before I can even take a lo0k – just that quick picture from the door before I’m spotted.  I try to sweet-talk my way in, but it is not to be.  Still, the church is very impressive to look at, even from the outside.

THE ARCHITECTURE

First, let’s look at a grand building there in the Octagon near St. Paul’s Cathedral: the Municipal Chambers, built in the Italian Renaissance style in 1880, also from Oamaru limestone.  The lamp bases aren’t bad either!

Also on the Octagon is the Regent Theatre, home to the Royal NZ Ballet and other shows.  Built in 1874, its interior is a combination of 19th century fashion and 1920’s art deco – a stunning combination, I think; classical and classy!

Another turn-of-the-20th-century building is the Dunedin Railway Station, again built of bluestone and Oamaru limestone.  I think it’s fabulous.  Ginger is not so sure.

C’mon, isn’t this the most resplendent train station you’ve ever seen?  The interior is also quite amazing, with a foyer of tile and a porcelain mosaic floor.

Other historical municipal buildings are the court house and jail – which are physically connected for the sake of efficiency.  Not all of the historical buildings are in great shape (for example, the warehouse buildings below, right).

Some of the residential homes downtown are reminiscent of New Orleans buildings of the same period – maybe it’s all that wrought iron (but definitely not the turret).

Below are samples of downtown business buildings.

Finally, I wanted to share our experience visiting a cafe downtown.  We saw people shooting up, with big syringes, right there at tables out front, in broad daylight!  So, of course, we had to try it too.  Or at least Ginger had to, that junky in need of a (sugar) high.  You order, select from a variety of fillings, take a seat, and soon appears a warm, sugar-coated doughnut (shell) and a large syringe filled with jelly, lemon, chocolate…, whatever your “fix”.  Just to keep it low calorie, it comes with a side of whipped cream, too.  Messy, yummy, the ultimate do-it-yourself rush.  It is an interesting take on the jelly doughnut.

DUNEDIN PUBLIC ART GALLERY

It’s the oldest gallery  in NZ, converted from 6 Victorian buildings into a very modern, gleaming museum, right on The Octagon.  The foyer has a work entitled “Cones” by NZ sculptor Cones by Neil DawsonNeil Dawson (his work also appears in our posts from Christchurch and Wellington, but unacknowledged).  Also note the cool spiral staircase barely visible on the left, from Victorian times. The museum has a traveling interactive exhibit of works by Seung Yul Oh that was fun; certainly Ginger got into it!  The pictures below show some of the art from this exhibition.

The Wonder Wall The core museum starts with an interesting introduction, “Wonderwall”, an entire wall of some great art!  This is the “salon style” of art display from the 1600’s.  The large room is otherwise empty, except for a full-size replica of the amazing “The Wrestlers” from 3rd century BC Greece.  The austere room and The Wrestlers, copy of 3rd Century Greek statuefabulous art is striking, and intriguing.  One of the ideas behind this type of presentation is to invite comparisons.  I note that many of these paintings show people looking out at me, looking in at them.  Ooooookay.  A little different.  In looking at art, I’m used to mentally putting myself in the picture.  Here I seem to be the picture, the gallery looking at me!  Turnabout!  Here are some pictures I like, up close.

The picture below is a fascinating “out there” piece of art created by Anne Ferran, an Australian artist, during a two-month artist-in-residence program at the museum.  From

Anne Ferran, Australian, 2001

Anne Ferran, Australian, 2001

across the room, it looked like a ghostly 3-D construction or a hologram.  Up close, it’s a ghostly picture of an infant’s christening gown.  It’s called a “photogram”; I suspect it’s done with x-rays using x-ray film.

OK,  on to some other art that impressed me.  Another “out there” fascinating collection by an American, Robert Rauschenberg, worked with unusual juxtapositions/allusions in color lithography, examples below.

I was blown away by the works of Frances Hodgkins.  Working in watercolor at the end of Impressionism/ beginning of Modernism, she captured the optical effects of light on water, along with movement and stillness, that I find incredibly beautiful.  Examples below.

Finally, let me show you some amazing linocuts (a woodblock-like process, but using linoleum) from the 1930’s.  Each color required one block , necessitating simple, abstract designs.  Yet this very simple, static process produced such a sense of speed and movement!  Printing was done by hand – a piece of paper was placed on the inked tile and rubbed – thus producing very affordable art for this industrial age.  The prints are grouped by artist.

That’s probably enough for one post!  The next and last post on Dunedin will showcase the fabulous Chinese Scholar’s Garden and the fascinating Polynesian exhibit at the Otago Museum.