Cooking School (Cook & Taste), Barcelona

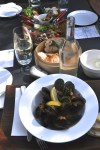
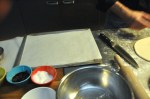
Let me interrupt my on-going blog on Britain, just recently started, and jump ahead to share with you this cool cooking class we took – in Barcelona, Spain.  My, we do get around, eh?  Well, we’re here for several reasons – it’s warmer here, for one – but mostly we’re here because there are travel restrictions on how long you can stay in different parts of Europe, so we have to move around and play this silly traveling game.  A real pain for us long-term travelers.

While walking down a narrow twisting alley in the barrio (the Gothic Quarter) of Barcelona, intentionally lost, we came upon a cooking school (Cook & Taste, http://www.cookandtaste.net).  Opportunity!  The food in Barcelona is really, really good, but in addition we had fallen in love with an Andalusian dish in Malaga, Spain (post of 7/10/13, “Malaga, Costa del Sol”), called berenjenas con miel, or eggplant with honey, a version of which we had found here in Barcelona.  Could they show us how to make that dish?  Sure, next week.  And sure enough, next week it was offered, and here we are!  This is what we learned.  Disclaimer – things move fast when cooking, so many pictures are not in good focus.

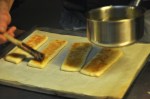
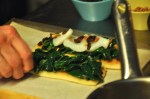
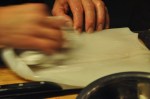
FLATBREAD WITH TOMATO

In Granada, everybody was eating this tomato flatbread for breakfast in all the restaurants.  Eh?  We passed on it – I’ll have the apricot jam, please.  Here in Barcelona, flatbread with tomato pretty much comes automatically when one orders jamon (cured

Green olive and jamon iberica starters
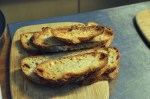
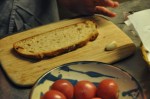
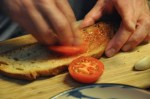
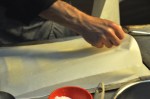
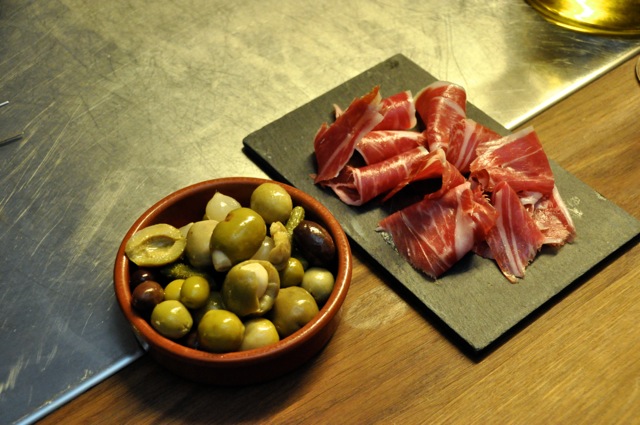
ham) – and it goes really well together!  It’s also really simple to make!  Start with toasted bread, rub it lightly with garlic, cut a small tomato in half and rub one of the halves over the bread (a little garlic, a lot of tomato), drizzle with olive oil, sprinkle with sea salt, cut to a good size (in this case 4 slices) and you’re ready to chomp.  It’s great with appetizers. (shown above).

CREMA CATALANA

Crema Catalana recipeThis desert needs to be prepared ahead and refrigerated.  It’s like a creme brulee, but a softer custard with less egg, and I think a slightly thicker, well-carmelized sugar coating.  Obtain lemon peel – our chef, Davíd, prefers to cut a large slice rather than using a grater to get the peel, since the grated peel can find it’s way into the custard and make it grainy.  One needs to cut thin slices and remove any pith, which can be bitter, from the slices.  Davíd  also scored the inside of the

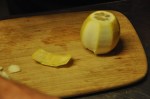
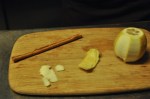
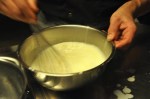
lemon peel a few times with his knife.  Bring the milk just to a simmer (small bubbles only), add the peel and cinnamon, and let steep at least 10 minutes to infuse the flavors.  The longer you let it infuse, the stronger the flavor.  Meantime, blend the egg yolks with

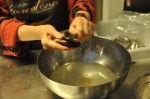
the corn starch and sugar in a bowl until the sugar is completely dissolved and the mixture becomes foamy and almost white.  Bring the milk mixture just to simmer again, and very slowly pour the mixture through a strainer into the egg mix, whisking to avoid cooking the egg; whisk all together.

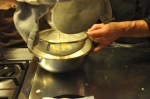
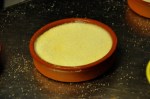
Pour mixture back into the saucepan and cook over low heat, stirring vigorously all the time with a wooden spoon until the cream thickens and one can make a line on the back of the spoon, as shown.  Pour into traditional terracotta dishes before the cream cools down.  Shake and tap to level the cream.  Place in refrigerator to chill.

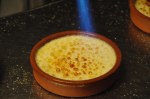
Just before serving, sprinkle with sugar to coat and caramelize with a blowtorch.  In order to avoid burning the sugar, you’ll probably need to do alternate torching with brief periods of cooling until you have the desired degree of carmelization.  Let the sugar harden for a

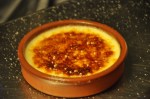
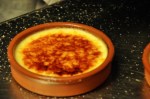
couple of minutes.  Add fruit for presentation, then have at it!

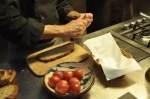
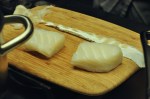
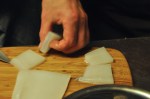
BERENJENAS CON MIEL y QUESO de CABRA  [Eggplant chips w/ honey & goat cheese)

Recipe
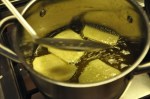
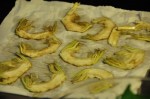
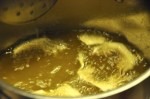
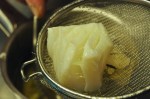
Cut eggplant crosswise into paper-thin rounds with mandolin.  Keep cuts circular (Davíd had to trim the eggplant to fit the slicer).  Soak the slices in milk to reduce their bitterness – around 10 minutes.  Fill a deep skillet halfway with oil (not extra virgin) and heat over moderate heat to 170° C.  Blot the


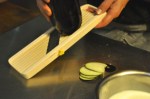
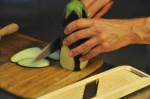
eggplant slices with a paper towel to remove the milk.  Dredge eggplant slices in the flour until thoroughly coated, lightly pressing if necessary to help the coating adhere, and gently shake to remove excess (the idea is to produce a very thin coating that will become crisp when fried). Drop the floured pieces into the 170° C oil.

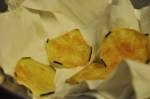
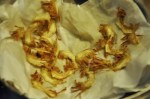
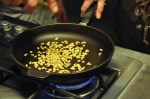
Only do a few at a time (our pan dictated 4).  Submerge, separate and turn slices in the oil with a slotted spoon until they begin to brown (golden brown), 1-2 minutes (or longer).  Transfer the chips to paper towels to drain.  Sprinkle with coarse sea salt.  Repeat for remaining chips.  Cut cubes of goat cheese.

Berenjenas con miel
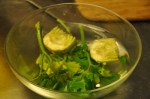
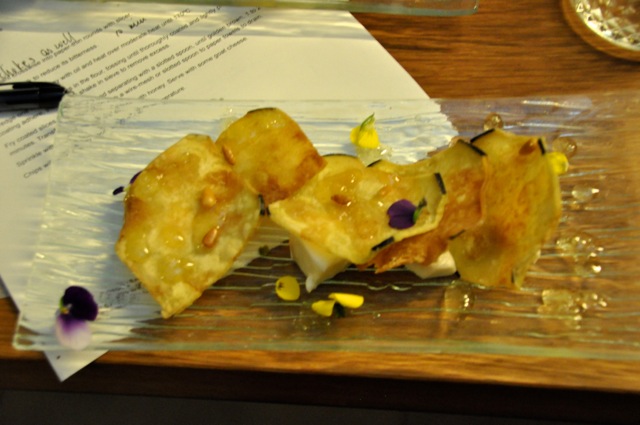
Place chips over cheese squares, drizzle with honey, and add toasted pine nuts and a presentation item (Davíd used viola flowers).  Fight for your share.  In Andalusia, the dish was a little different – no cheese, and they used a molasses-like cane sugar instead of honey.  Both are good!
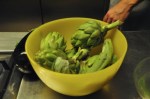
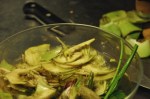
FRIED ARTICHOKES

As an added bonus, Davíd showed us how to fry artichokes using this same system.  First he removed the scales to get to the heart, then removed the stem and trimmed the base.  The top part of the artichoke, about half of it, is removed, the artichoke cut in half longitudinally, and the choke is cut out.  It is then placed in water with parsley to prevent

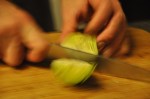
the browning reaction (I didn’t know parsley did that!).  When ready to fry, the artichokes are sliced very thin, dried on a paper towel, dredged in the flour like the berenjenas, and

fried.  They fry quickly!  Drain on a paper towel, sprinkle with sea salt, and they’re ready to go.  Thanks Davíd, they were great!

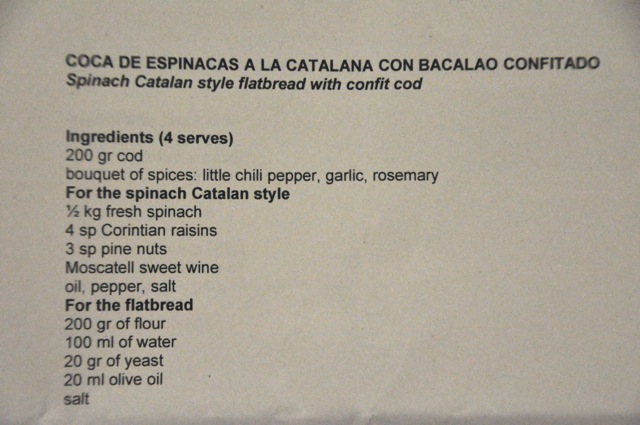
COCA DE SEPINACAS A LA CATALANA CON BACALAO CONFITADO                                 (Catalan style Spinach Flatbread with Confit Cod)

Cod on flatbread with spinach
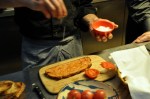
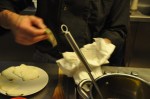
Actually, before we started this recipe Davíd prepared a quick appetizer with the cod.  The cod came from a farmers’ market where chunks had been soaking in salt water for 3 days.  Davíd sliced off the remaining skin and cut 4 small pieces off the fish chunk.  He drizzled the pieces with (infused) olive oil (see below) and added a garnish of chive

sprouts and chopped pistachio nuts.  Ready to eat!  It was good, but next time I would add some sea salt.

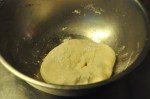
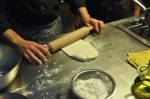
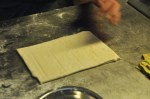
For the flatbread, work all ingredients as a normal bread dough.  Let it rest until if rises for 1 hour.  Meanwhile, warm the oil in a saucepan, remove from heat, add the bouquet of spices (whatever you want), and let infuse for awhile.  When the dough is ready, roll it out, trim to a rectangle, and cut it to size.  Place the pieces on parchment on a tray, and brush with the infused oil.  Cover with parchment, put weight on the top (another baking tray), and bake until golden brown (180°C, 10 minutes).  Brush with infused oil again.

Cut the cod into pieces and put into infused oil that has just come to a simmer; remove from heat and let stand until cod looses transparency and becomes flaky.  Clean the

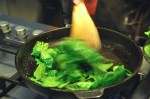
spinach under tap water and remove stems.  Let the raisins soak in Moscatell wine for 30 minutes.  Brown the pine nuts for 2 minutes in a nonstick frying pan with a few drops of olive oil.  Remove the pine nuts and add the infused raisins with their liquid; stir until thickened (this happens quickly) and pour back into their bowl.  Add more oil and saute the spinach briefly, adding a sprinkle of salt; do this in small batches, adding a little oil

each time.  Put some spinach on each piece of flatbread and arrange large flakes of the cod on top.  Add some of the raisin mixture and pine nuts.  Move to a plate and add more

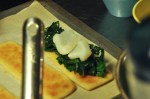
raisins and pine nuts.  Davíd also added a dollop of reduced raspberry balsamic vinegar on the side.  It came from a bottle, and was a nice addition to the flavors.  I would have added a little sea salt.

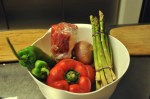
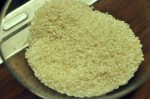
PAELLA DE MARISCO (Seafood paella)

Seafood Paella
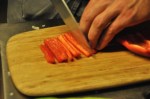
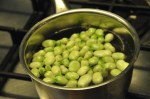
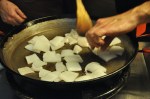
To this list of ingredients we added some fava beans, a red bell pepper as well as the green, asparagus, some of the unsliced artichokes, and smoked paprika.  Prepare all the ingredients.  Dice the onion and garlic.  Cut some peppers into strips (for presentation) and dice the rest.  Wash the asparagus and remove their lower stem.  Grate the tomatoes

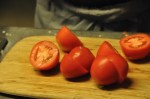
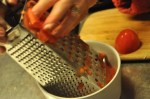
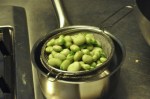
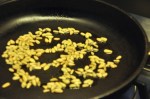
as shown.  Cook the fava beans, drain and let cool; remove the outer skin.

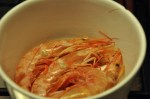
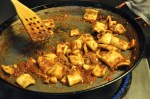
Soak the clams in salty water and then rinse.  Check that the clams and mussels are alive (if they are open, knock them on the table and discard if they stay open).  De-beard the mussels and clean their shells (we scraped them with a knife).  Clean the squid interior by scraping with a paper towel.  Cut the squid into squares, about 1.5 inches.  If desired, trim the whiskers off the prawns.

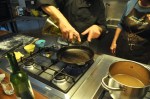
When everything is ready, heat the oil in a paella pan (until a drop of water sizzles) and saute the prawns briefly (count to 20, turn, count 20 again, remove).  Turn on the outer

propane ring.  For the paella you want even heat, and since you don’t want more than a layer or two of rice, you need a large skillet with a wide heat source (or two skillets …).  Add the squid to the pan, spread out the squares, and wait until the squid squares are “popping up”.  Add more oil to the side of the pan as needed.  Do not turn.  The longer you cook the squid the more tender it will be, so cooking it for something like 45 minutes

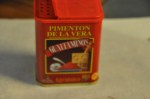
(overall) is good.  Brown only 1 side (you’re going to be adding water).  When the squares have popped up, stir and add the onion and the diced peppers and carmelize, constantly scraping the pan to deglaze.  Add some wine to continue the deglazing as the water evaporates.  90% of the taste is this “attacking the brown”.  When onions are browned, add the garlic and when it starts to brown, sprinkle with smoked paprika and add the grated

tomato on top of the paprika, mixing quickly so the paprika doesn’t burn.  Scrape and deglaze and let all the liquid from the tomatoes evaporate.  Add the asparagus, artichokes

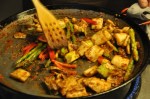
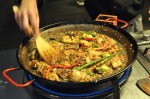
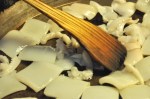
and remaining pepper slices, stir, and cook for a few minutes.  Add the rice and stir well to coat, a minute or two.  Flatten the food to a layer, with no holes.  Add the saffron to the boiling stock, then add the stock slowly to the preparation.  Do not stir!  Rice can’t be touched beyond this point!

Increase the heat to medium-high and cook for +/- 8 minutes.  (Davíd used high heat for 5 minutes).  Then add the clams and mussels, pushing them slightly into the remaining liquid.  Taste the stock for seasoning – it must taste slightly salty (rice will absorb and dilute it).  Reduce heat to a minimum (say the notes) and cook for an additional +/- 10 minutes (Davíd says cook for a total of 15 minutes).  Davíd didn’t really time it so much as check it.  As the liquid went down, he turned the heat down.  It was done when there was

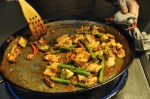
essentially no liquid at the bottom of the pan.  You want rice with some dryness.  Davíd also noted that after adding the clams and mussels one could take the pan to the oven at 180°C for 12 minutes (gets even heat!) rather than keeping it on the flame.  Right near the end, add the fava beans and arrange the prawns in a decorative pattern and allow them to heat up.  When the time is up, take the pan off the heat and cover with a cloth for 3 – 4

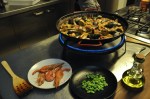
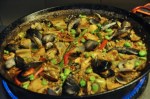
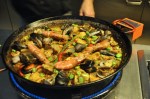
minutes to steam (the notes say only “stand for about 5 minutes before serving” [no mention of a cover]).  For Davíd, wanting rice with some dryness, if the rice is done and there is still some water, he doesn’t cover or he covers with a cloth to let the steam escape.

One could cover with aluminum foil to keep the rice wetter.

You’re ready to go!  It tasted every bit as good as it looks.

Well!  Hope you enjoyed this diversion from our travel blog.  The next post will be back in England, visiting the fabulous city of York.


Harewood mansion, near Leeds

Harewood is a monster of a mansion.  Built from 1759 – 1771, it is a masterpiece of

Georgian architecture.  The Earl Edwin Lascelles wanted nothing but the best and employed the finest craftsmen of the time: architect John Carr, interior designer Robert Adam, furniture maker Thomas Chippendale, and visionary landscape gardener Lancelot ‘Capability’ Brown.  That backyard, shown below?  No, not that simple patio garden in the foreground, silly, we mean Harewood backyardthe trees and lakes going off into the distance in all directions – that’s all Brown’s landscaping and tree planting, making it look manicured but natural, just so.  With regard to expenses: “Let us do everything properly and well ….”  The place defines filthy rich, with Renaissance masterpieces, exquisite family portraits by artists like Reynolds and Gainsborough, an enormous collection of Sèvres china – a lot of it previously owned by Kings Louis XV and XVI (and some ordered by Louis XVI but not delivered due to a decapitation problem), etc etc.

Today Harewood is one of England’s “Treasure Houses”, a consortium of 9 of the foremost stately homes in England still in private ownership that market and promote themselves as tourist venues.  The Lascelles – Earl and Countess of Harewood – still live there, but since the place is beyond huge, we’re sure they don’t miss the area accessible to the public – although even that area becomes available to them after hours and in the winter.  So let’s take a peek at the life of the English aristocratic rich ….

The "Old Library" - hard to get it all in one picture!We’re starting with the OMG ceilings, each room different, each designed by Robert Adam, with a rug designed to complement it.  Of course the wallpaper and rugs have been restored now to reflect what it would have been; the fireplaces are original and the ceilings have their original plaster work (though it has been repainted).  It’s impossible to really get an entire room in a photo and still see the incredible detail, as illustrated in the picture to the left, so we’ll just show some of the ceilings.  We think you’ll agree, they’re pretty incredible.  Of course you need to add the full-room floor rug with a pattern that’s riffing off the ceiling design to get the full effect.


Apparently if one has a lot of money, there’s nothing to do but collect expensive things, and then show them off (flaunt?); so there are a lot of collections on display, such as ladies fans (from the days before air-conditioning).  There were lots of fans (!), so we’ll just show a few that impressed us.

We’ll start our tour of Harewood with Edwin Lascelles’ bedroom.  The bed is from

Chippendale.  Ah, to avoid repeating “from Chippendale”, let us note that every piece of furniture in the house was designed and made by Chippendale!  The Chinese wallpaper, from the 1760’s, is spectacular.  It’s the original; out of favor in the early 1800’s, it was cut from the walls and stored away – for 200 years, and nearly perfectly preserved.  Hand-painted on fabric made from mulberry bark, it’s a continuous landscape of traditional Chinese rural life.

Lord Harewell's Sitting RoomNext is Lord Harewell’s Sitting Room.  Every room has a unique fireplace, and above that, usually a large mirror slightly tilted so that it reflects the fabulous ceiling.  This room has some line drawings of unclad females, but also has some pretty fabulous paintings – like J.M.W. Turner (1789) – who painted the Harewood mansion (!), Thomas Girtin (1801 – you probably don’t know him [we didn’t]; he outshone his friend Turner and played a key role in establishing watercolor as a reputable art form, but he died young), and two paintings by John Singer Sargent (1905, 1913).

The State Bedroom was reserved for visiting royalty or heads of state, such as the Grand Duke Nicholas of Russia (1816) and the future Queen Victoria (1835) – ie., it was

used infrequently.  The bed and furniture are Chippendale, of course – and they’re spectacular.

Next is the Main Library, a Victorian room with imposing mahogany bookcases with brass inlay and marble chair rail.

Then the Yellow Drawing Room – not too shabby.  The porcelain throughout the house is astounding.

The Cinnamon Drawing RoomThe Cinnamon Drawing Room is enormously long and houses a lot of collected treasure.  Edwin Lascelles – and his son after him – had an eye for beautiful objects and a bank account to support expensive tastes.  Maybe you noticed the Chinese pottery in nearly every room shown so far – like the Ming vases in the Main Library above.  How about these next gems?  The first vase below (French, 1740-1760), has a Chinese celadon glaze, a dolphin body, a ram’s head below the spout, and serpent handles.

The other celadon-glazed vase is also French (1774-1795) and is thought to have come from the Palace of Versailles.  And the paintings?  We’re talking private collection here –

how about having on your wall a Bellini, or Filippino Lippi, or Titian, or El Greco, or Jusepe de Ribera?  Finally – for this room – the china.  How boring, you say?  Well, a short history lesson is needed!  When Louis XV moved the government and court to the Palace at Versailles, it became the center of society, art and fashion.  The King (and his mistresses Madames de Pompadour and du Barry) commissioned the greatest artists and craftsmen of the day; in particular, their patronage of Sèvres porcelain was key to that factory’s success.  After the fall of the Bastille, the new government confiscated and sold the art, and France’s finest made its way to the wealthiest families in Europe.  In England in the early 1800’s, French style and culture was the fashion, and Sèvres porcelain was one of the more prized Porcelain display roompossessions.  Here at Harewood, there is an entire hall of this porcelain in display cases, so many different place settings that one gets tired looking at it.  That’s in addition to a room where some of the best is displayed, and where looking is much less tiresome!  Here are some examples – and some from the table of Louis XVI and Marie Antoinette, delivered a year before their executions.  They are spectacular.

Just because I thought it was gorgeous, here are pictures of a cabinet from that room.

The State Dining RoomOK, we’re nearing the end of the display of conspicuous consumption.  Just a few more rooms to look at.  This is the State Dining Room.  It still has the original furniture, but everything else, including the stone fireplace, was remodeled in the 1840s.  Of course the dinnerware is still (yet more) Sèvres porcelain.  The portraits on the wall are the various Earls and Countesses of Harewood.  The fireplace (below), is pretty spectacular, with its head of Bacchus (god of food and wine).  The

Chippendale furniture is remarkable; the (urn-topped) pedestal conceals racks to keep plates warm; the urn itself is lead-lined, to be filled with ice to keep beverages cold.  That oval “cellaret” beneath the (superb) side-table?  That’s a lead-lined wine cooler for use during the meal.

The Music RoomFinally, the Music Room.  It’s pretty much unchanged since 1771.  The Chippendale inlay on the furniture (shown below) is amazing.  The vase, Sèvres of course, is from 1770.

I guess I have mixed reactions to this incredible extravagance on display.  Look simply at that Chippendale inlay above.  Every piece of furniture in the house is like that.  Really?  Every piece?  When is enough enough?  Is “Because I can” a sufficient justification for doing?  Primarily I am repulsed by the need to own 1,000 pieces of Sèvres porcelain dinnerware and the total output of the Chippendale factory for several years.  On the other hand, would these beautiful items be here for us to see if not for the extravagance of the rich?  Haven’t the arts almost always relied on rich supporters?  I remain ambivalently repulsed.

Then again, out of curiosity I queried the internet on how the Earl Edwin Lascelles made this incredible fortune that his heirs continue to enjoy to this day.  Funny, the Visitor Guides and brochures don’t say a word about that.  The Earl made his fortune in 3 areas: in “Customs positions” (I don’t know about the Earl, but historically being in charge of who pays how much in customs down there at the docks was a very rewarding profession); in money lending; and in the slave trade.  Yeah.  That unearthed info makes me see the lavish display of wealth (and aristocratic power) in an even less sympathetic light.  Methinks scruples and wealth frequently have an inverse relationship; the pillars of capitalism do not rest on a moral foundation.  I confess I have great admiration for Bill Gates, however he has decorated his house – he seems to be trying to do good.  For most of the 1% – couldn’t you get by on maybe just 500 pieces of Sèvres porcelain?

I offer a small apology regarding these ruminations over wealth.  Wealth does divide us.  I must say I’m content with my middle-class life.  Yet somewhere in my head there is a notion, right or wrong, that great wealth also comes with greater responsibilities; there is a greater chance for impact.  When the incredible wealth of a place like Harewood slaps you in the face with its extravagance, it’s hard not to see it as, sadly, simple narcissism and lost opportunity.

Next post – the incredible city of York (and no philosophical meanderings).

Leeds and the Royal Armory Museum

Royal Armory MuseumThe Royal Armory Museum was moved here from London.  It’s located away from downtown Leeds, across the river but still within walking distance.  It’s not small, as you can see.  Still, we thought we could view all the interesting stuff in an afternoon.  Boy was that wrong!  We spent another entire day, and did not see it all.  It contains a history of the world’s weapons and armor – almost always the real McCoys!  There are Roman artifacts, lots of medieval armor from throughout the world –  the UK, Japan, India … the only elephant armor in existence … jousting armor worn by the Holy Roman Emperor Maximilian I, ditto for Henry VIII, etc.

Let me give you the flavor of the place by showing you this incredible suit of armor, called the “Lion Armor”.  It’s Italian or French (the provenance is uncertain), from about 1550.  It’s highly decorated, with embossed lion heads at the shoulders, elbows, gauntlets and

knees.  One large lion head forms the top and back of the helmet.  The intricate decoration is applied gold.  Apparently the armor was not just ceremonial but was used in combat, as suggested by the sword cuts on the helmet’s left side.

Armor became not only protective gear in battle, requiring technical expertise in its manufacture, but also a fashion statement, requiring the skills of the best craftsmen in Europe.  National styles developed; for instance, the high point in style (‘Gothic’) came from Germany in the mid 1400’s, with ripple-like fluting imitating the darts and tucks of contemporary dress.  Many suits of armor were in color (eg, sky blue), but only traces of the original color remain after all these years.  A little different from the shiny metal armor we thought, eh?

The Armory had room after packed room!  The displays were arranged around countries and themes (Japan, jousting etc.) rather than chronologically.  I was interested in the temporal development of the weaponry and armor throughout the world, so I’ve tried to organize what we saw accordingly (but let’s be clear, this is only based on the Armory’s collection, and I am far from an historian).  Let me also be clear – this is a looooonnggg post, wading through changes in history that will not be very compelling to many; you may find it useful to just skim through the pictures and wait for the next post!

Picture of bronze-plate armor from a tomb in Greece, 1400BCI’ll start with Bronze-age armor.  The knowledge of how to make bronze disseminated slowly from the Middle East, where it originated.   It didn’t find its way to Britain and into armor and weapons until much later.  And since this is the UK Armory, very early weaponry and armor, such as this bronze armor from Greece (1400 BC), are presented only in pictures. These bronze plates would have been worn by a charioteer during an age when light chariots were the mainstay of armies.

Later, armies were primarily composed of infantry spearmen, with shields and helmets.  There was a lot of variation in the design of helmets and shields across Europe and Asia.

The bronze helmets pictured above are Danish, from 1000 BC.  Around 700 BC the elegant bronze “Corinthian” helmet appeared in Greece and became the most popular helmet type

for the next 300 years.  The Armory owns the Corinthian helmets shown above (650 BC) as well as the Italian bronze armor (400 – 300 Illustration of Alexander the Great's battle against India, 327 BCBC) that was used by infantry and calvary (above, right) – hence the reflections and fuzziness from photographing through glass cases.

Next we enter the time of Alexander the Great:  the infantry, which charged and fought in a deep phalanx, was armed with long spears wielded with two hands; the cavalry charged with lances rather than throwing javelins from a distance, and were all but invincible.

And then came the Romans!  Their armies morphed from infantry with spears to infantry with javelins, shields, and knives/short swords designed for thrusting in close quarters.

The Roman conquest of Britain proceeded gradually, from 43 -80 AD. The Celts and Picts of the far north, armed with long swords, relied more on the ferocity of their charge than on defensive armor; they frequently fought naked but painted to make them look more

ferocious.  The Roman cavalry was usually neither heavily armored nor very effective, used mostly to chase down defeated stragglers.  However, in response to notable defeats at the hands of cataphracts (armored heavy cavalry) in Asia Minor (picture below left), the Roman Empire in its later years adopted this style of warfare, in which armored rider and

horse led full-gallop charges to break through infantry formations (above right).  Note the emerging appearance of the armor of Medieval times.

With the fall of Rome came the Dark Ages, and for Britain that meant an influx of Saxons (Germany) and Vikings (Denmark, Norway, Sweden).  Castles were needed!  So were historians, but alas, they were not in vogue, simple survival being more important.  I can The "star helmet", named for the straps of the framework; Italy, 500 ADonly pull together bits and pieces from AD 400 to 1000.  The Saxons usually fought as a “shield wall”, dense lines of spearmen carrying large shields, supported by light infantry and limited cavalry (who dismounted for battle).  The raiding Vikings had shields, axe or sword, helmets and mail shirts.  The picture to the left is a “star helmet”, Italian, 500 AD, named for the radiating straps of the framework.  Introduced from Asia, it became a European standard for over those 600 years.  Other helmets from that 600-year-period are shown below.  The last helmet is in the Armory; it’s made of 4 iron plates covered with gilt copper, silver rivets, and originally had a silver band around the base.

I’m ignoring inter-Britain warfare between the clans of Scotland and the local kings of England, not to mention inter-clan warfare and inter-king warfare, and of course French skirmishes.  Oh boy were castles needed!  Then came the Normans, French descendants of Viking settlers in northern France.  The Norman army that conquered the weary forces of England in 1066 relied on armored cavalry charging with the lance, followed by swords for the second phase of close combat.  Soldiers wore mail armor, one-piece iron helmets, and carried kite-shaped shields.  This type of mounted knight dominated the battlefields of

Europe for the next 4 centuries, and it is from this period on that the Leeds Armory starts to show its true gems, no longer relying on pictures from elsewhere.  Interestingly, it includes armor from all the known world.  I should point out that taking photos was tough!  The lighting was often very dim, my autofocus would not work, and there were reflections from the glass cases.  You must forgive the following poor performance.

Mongolian helmet, 1200'sWe’ll start with a Mongolian helmet from the 1200’s, decorated in silver overlay of stylized Chinese lions and (Buddhist) priests.  This type of helmet was used from the 800’s to the 1300’s in Asia.  Notice that armor was art!  If you’re going to die in battle, look spiffy!  Or was it to make the ladies swoon?  For me, seeing this armor gave a new perspective on warfare and the times.

Armor worn by mounted samurai, about 1300 ADThe Far East was of course not a stranger to warfare; sadly, war seems to define humanity.  This armor would be worn by a mounted Japanese samurai from about 1300 AD.  Only a few of the originals survive – this is  a valuable exact copy of an original in Japan, incorporating some parts from that time.

We move now to the more plentiful displays from the 1400’s and later.  Let’s stay with non-England: the (real) armor below is from a Turkish heavy cavalryman from the late 1400’s.  Mail and armor for man and horse are standard; the cavalryman carried a bow, sword, and sometimes a lance, the usual armaments of all medieval Islamic armies.  The helmet on the right is also Turkish, decorated with calligraphy, in gold and silver.

Let’s not forget the weapons!  The really old swords, often recovered from graves and bogs, are usually pretty rusted and corroded.  This one is Chinese, from the Ming dynasty, about

1420, made for presentation to a Tibetan monastery (where it was kept in good shape).

The Mongol heavy cavalryman shown below wears lamellar armor, a standard from the

Composite bow and arrows 1200’s into the 1600’s, when it was replaced by mail and plate armor.  The Mongol’s principal weapon was the composite bow (shown on left), but many had lance and sword as well.

The late 1400’s (the time of King Richard III of Shakespeare fame) is a strength of this Armory – a time when knighthood flourished.  Knights were hired guns (on horseback) of lower nobility, who were paid with titles and land grants.  They formed the basis of most early medieval armies, along with the knights’ vassals (spearmen and cross-bow men) who were paid in land use (and pillage).  The earlier Norman mail evolved to plate armor, with impressive craftsmanship combining technical effectiveness and elegance.  National styles emerged in Europe, with Germany’s “Gothic” style (with ripple-like fluting reflecting current fashion) and Italy’s smooth rounded plates leading the way.  The armory has a significant collection from this time period.  Examples are shown below.

Bohemian soldier, late 1400'sThe ornate, sophisticated armor of the knights can be contrasted with that of their vassal soldiers, as illustrated by this Bohemian (now the Czech republic) spearman shown on the left.

Japanese laquered lamellar plate armor, mid 1500'sBy the mid 1500’s, Japanese armor had evolved significantly from the crude iron plate of the 1300’s that was shown earlier.  A sophisticated lamellar style of armor using iron plates that were lacquered black (picture on the right) emerged.  Although there are some obvious similarities, this Japanese armor makes quite a contrast with the full body armor of Europe!

Below are shown weapons from various countries, from about 1560.

Some other examples of armor from the mid 1500’s are shown below.

This suit of armor is believed to have been dark blue and gold.

During the 15th and 16th century  jousting reached a peak of popularity.  These were extreme and lavish sporting events bringing competitors from far and wide, organized to show royal or noble power.  Contestants, separated by a wall to prevent collisions, passed each other on the left side, so this side of their armor was more heavily reinforced.  The armor was heavy but only worn for short periods.  The jouster was locked in facing forward and the helmet was bolted to the breastplate to prevent the head from being forced back by a blow.  Like regular armor, there was a German style and an Italian style.  Examples are shown below.

The museum had quite a few exhibits from the 1600’s, many from other countries.  The armor of India was clearly behind the times; as shown in the pictures below, the armor resembles that shown for the Turkish cavalryman 200 years earlier.  The weaponry of the

Indian heavy cavalry, in addition to a cane shield, would have been diverse – combinations of the sword, composite bow, lance, mace, and saddle axe.  The helmet (below), from

the early 1600’s, was still in use when captured in 1799.  And the body armor, worn with shoulder straps, would make a Roman soldier cry.  What India did have, was a cavalry – shock troops – of elephants.  This is the only surviving elephant armor in a public collection, worldwide.

The armor of Japan and China were quite different in the 1600’s.  The Japanese armor of 1613, shown below,  has small lamellar plates covered in cloth.

The Chinese armor more closely resembles the clothes of the time and is similar to armor called “brigandine” in Europe.  It consists of a jacket of heavy fabric with separate sleeves, covered with embroidered silk and lined with numerous small tinned iron plates fastened by gilt rivets.  To this were added ornate shoulder guards and leg defenses.  This type of armor became the most common type in China during the Qing dynasty (1644 – 1912).

I would be remiss if I did not speak of the Chinese influence on warfare – principally via inventions of the crossbow and, of course, gunpowder.  One of the great innovations in Repeating crossbow, China, 1800'smilitary technology was the crossbow, and in particular the cast bronze lock mechanism.  Excavated examples of early forms date from the Han period of Chinese rule (200 BC – 200 AD) (!!).  The crossbow continued to be an important weapon in China until the 1800’s.  Alas, I only took pictures of this intriguing weapon, the repeating crossbow from China, from a later date, the 1800’s.   The lever attached to the magazine top worked the crossbow by pump-action.

Gunpowder was a true revolution in warfare, but it took a while to become effective.   The recipe for gunpowder dates  back to 600 – 700 AD in China, although its adoption for military purposes came much later; 950 AD saw it being used in an exploding arrow and as a fire-lance, the immediate ancestor of the gun.  The fire-lance was a bamboo tube mounted on the end of a long pole and filled with gunpowder so that when ignited, it spat out flame.  Later versions added fragments of metal or porcelain or arrows.  The metal-barrelled cannon also came from China, cast in bronze about 1288 and in iron in 1338 AD.

Cannon were originally mounted on four-legged benches; wheeled carriages were introduced between 1300-1350 AD.  The “Silk gun”, above right, is bronze, bound with fiber and covered in silk.  Light and portable, these are often seen mounted on four-legged benches in Ming dynasty battle scenes.

Next we’ll look at examples of armor and weapons from Persia, India, China and Japan during the 1700’s.  Persian armor at this time still has simple hinged torso panels, 200 years after the development of fitted  suit armor in Europe!  The formidable-looking axe was designed to penetrate plate armor and mail.

Indian armor has changed considerably from what we saw in the 1600’s, as shown in the pictures below.

This type of armor was introduced to the Islamic world by the Mongols in the 1200’s.  The first picture above demonstrates the combination of quilted cotton fabric, mail and plate.  The remaining armors use multiple layers of cloth sewn tightly together and covered with a rich material, usually velvet, and decorated with patterns of small gilt nails, giving them the name “coat of a thousand nails”.  Large steel plates are set at strategic places.

By the late 1700’s Indian armor had changed again, reverting to a style much like that of the 1600’s (below).  By this time a large proportion of north Indian cavalry were armed with firearms such as matchlock muskets; perhaps the armor reverted in response?

In contrast, the armor of Japan and China changed little in the 1700’s.  In Japan, after the Tokugawa shoguns imposed peace in the early 1600’s, the military class was only expected to maintain readiness.  The armor shown below is from a middle-ranking samurai,

the armor based on the practical styles developed during the Japanese civil wars of the 1500’s.  Note the similarity with the armor of 1613 shown earlier.

Similarly, there is little change in China’s lamellar armor, shown below.  The first image shows armor for a cavalryman (1736-1795) consisting of a sleeveless vest of embroidered cotton lined with tinned iron plates, shoulder guards, a groin defense, and defense for the legs.  Note the visible overlapping iron plates on the leg recalling earlier lamellar armor.  The next image shows typical leather lamellar armor from western China, also from the 1700’s.  The rawhide is heavily lacquered.  Similar leather lamellae have been excavated in China from 500 AD (!), demonstrating the long period of use of this form of armor.  A surviving photograph shows this coat still in use in the early 1900’s!

Finally (finally!) we end this study of weaponry with the early 1800’s.  I find it amazing that this type of armor was still being used, although the examples in the Armory were from Persia and India.  The Persian armor is similar to that of the 1700’s, as shown below.

The armor of India seems even more regressive, although the weapons are incredibly ornate.

Pistol shield, India, mid 1800'sOne interesting weapon from India is this pistol shield from the mid 1800’s.  The 4 pistols built into this shield were discharged two at a time by means of two triggers – after the muzzle covers were manually lifted.   The accuracy was apparently poor, and best used with the shield touching or almost touching the opponent.


Wow!  This post was a lot of hard work, extracting the evolution of weapons and armor from what’s available in the Royal Armory.  If you are still reading this oh-so-long post, my hat is off to you!  I did find the toil to be nevertheless interesting – hope you did too.

Next post – and last from Leeds – the Harewood mansion, a masterpiece of Georgian architecture, but even more, a mind-boggling view of aristocratic extravagance.

Leeds, the City

Welcome to the UK!  Following our New Zealand adventures, we’re starting off our UK exploration in Leeds, England.  Why Leeds, you ask?   Ah, yeah.  Good question!  The adventurous life can have interesting twists.  We signed up to do a house-sitting there, but the house turned out to be a filthy, unlivable disaster!  We barely dodged that bullet.  I won’t bore you with the story, it all worked out, but lesson learned: get lots of pictures before committing!

So here we are in Leeds, which is apparently NOT a city that attracts a lot of tourists  – we were continually asked “Why are you here?” by locals.  Yes, Leeds is overshadowed by nearby York (we’ll get to York in a future post!), but we found the Victorian architecture wonderful; the Royal Armory (moved from London) surprisingly captivating; and a visit to the nearby manor Harewood (still home to an Earl and Countess) fascinating, with its insight into the jaw-dropping (and shocking!) display of aristocratic wealth from the late 1700’s to the present.  It’s too much to cover in one post, so I’ll start just with the city itself.

Let’s begin by looking at some buildings!  These pictures will give you a very small taste of the marvelous Victorian architecture here.

That last picture is of Whitelocks, the oldest bar in Leeds (licensed in 1715, rebuilt in the 1880’s and extended into the row of Georgian working men’s cottages).  Surely I can’t describe an English city without showing you an English pub, right?  It’s delightful, with stained glass windows and a copper-topped bar.  The beer isn’t bad , either!

Back to our buildings:  the exterior detail (on both new and old buildings) is impressive (see below).  Lots of flourishes!

The Corn Exchange is an amazing building, built in the 1860’s as a clearing house for the sale of grains in England and Scotland.  It had 170 trading stands and continued strongly into the 1950’s.  Of note is the amazing design of the roof that allowed uniform (northern) light for the careful inspection of the grains.  Today it contains specialty retail stores.

Although lacking in historical impact, Leeds leads in shopping – apparently second only to London.  The shops are indeed impressive, both Victorian and modern.  The Victorian arcades are especially captivating, as shown below.

The modern arcade is impressive as well.

In the Victoria Gate Arcade there were two huge window displays of antique sewing machines that we found very interesting.  Fancy decoration!

Shops and City Market in LeedsThe city market is located in a very impressive building with an equally impressive interior; the food displays are a riot of color, combined with jostling but polite people and barkers hawking their wares.  I was particularly caught by the seafood on display.  The images below are just a peek.

The Leeds Art Gallery was a disappointment, the art collection being surprisingly small.  I was impressed with an artist I had never heard of, Christopher Nevinson, a “Futurist” painting during World War I; examples below.

Engraving, I missed getting the artistAnother gem was this engraving, but alas, I missed the artist.

The real art in the art gallery was its coffee shop, an incredible room of tile and decoration,  shown below.  Around the room, high up, were busts of famous authors of the UK (Burns, Scott, etc.) and others more ancient (Homer, Dante).

15th century baptismalFinally, a visit to Leeds Minster (Cathedral).  As English churches go, the Leeds Minster is tiny and relatively new (a church has been here since before the 11th century, but several previous versions were destroyed by fire; this one was built in the 1840’s).  Still, it is a very attractive church, with some preserved items from its past.  The baptismal shown here is from the 1400’s (used until 1883).  Earlier yet is the Leeds cross, dating to the 900’s.  It was found built into the previous medieval church structure when the new church was begun.  The cross would originally have stood outside the church, together with other crosses, likely as grave markers.  The carvings juxtapose Christian and pagan

images, indicating the mixed nature of 10th century society.

Pictures of the church:

Pictures of the stained glass:

That’s it for the city of Leeds itself.  OK, it’s not a tourist destination, but for us that was part of its attraction; it’s a normal UK city, attractively going about its daily life, yet for us newcomers to the UK, impressive in its old roots.

Next post, the Leeds Royal Armory Museum.


Leaving New Zealand – and a salute to the lovely Ruby Bay

We’re leaving the Tongariro National Park and making a bee-line for Auckland (it’s not our favorite part of NZ, but it’s from whence we must, alas, depart).  This trip back was particularly interesting because, inadvertently, we wandered through what must be life lived within a cloud.  Not exactly heaven-on-earth with harps and all that, but certainly a ghostly, atmospheric world.  If you lived here, however, it must be both atmospheric and an absolute royal pain in the patootie.  I confess I’m surmising here, but I’ll bet I’m right.  I showed you these interesting pictures in the previous post (October 16, 2014; Tongariro Alpine Crossing – My NZ Highlight):

The first picture is from our hotel Chateau Tongariro, in the evening, the second from the volcanoes of the Tongariro Alpine Crossing the next day.  On both days one sees a valley absolutely (and picturesquely) submerged in clouds.  So on the 3rd day, on the way back to Auckland, what do we Home on the (green) range in NZencounter, besides the usual NZ rural splendor, shown to the left?  We encounter a valley in clouds.  As shown below, a BIG valley, with clouds going to the horizon in all directions.  As our road goes up and down hills, and we go in-and-out of white, we pass farms in the mist, with farmers working away like all is normal.  Sometimes the air is clear, with a white ceiling; most of the time the cloud swirls around, and the world is in

soft focus, with filtered light, mostly in shades of gray.  It would be interesting to smooze with the locals in a bar about life here, but we must press on.

Finally we are in Auckland, where we sell back our trusty car, donate a bunch of stuff to the Salvation Army, and get ready to depart.  We will miss NZ!  A final look at Auckland, an OK city in an amazingly beautiful country.

…………………………………………………………………………………………………………………

Before I close out this NZ chapter in our adventures, let me share with you again the beautiful Ruby Bay; we rented a house there and lived in it for about 4 months.  It was a bit of paradise!  The (many) pictures below were mostly taken from the house itself.  To us, the views were spectacularly, impossibly beautiful, captivating us each day.  I said above, “share with you again” because I have already shown you other amazing views of Ruby Bay (Feb 17, 2014; “Receding hills, view from Ruby Bay balcony“).  These are all new pictures, and I could easily – oh, believe me! – easily have included twice as many, and more!  Of course the pictures below are more than any sane person would want to see (they’re for us), but look at a few – and be amazed, like we were.  Ask why we left (they made us!).  The pictures are categorized by view from our house, looking in different directions at different landmarks.

The Islands In The Distance

The Mountain Across The Bay

The City of Nelson, Across the Bay

Rabbit Island, Nearby

Sky and Ocean

Good Bye, New Zealand!  We miss you!

Next stop: The UK

Tongariro Alpine Crossing – My NZ Highlight

We’re off to visit Tongariro National Park up in the mountains.  Volcanic mountains.   I’m particularly interested in the Tongariro Alpine Crossing, regarded as NZ’s best day hike – and certainly its most popular.   Although it’s a day hike, it’s a long one – 12 miles in length with a 2400 ft elevation change.  You get dropped off at one end and picked up at the other, so you have to complete the climb in the allotted hours.  At this time of the year, however, the hike is iffy – it’s dangerous if you’re caught on the trail in a storm, and all but impassable in snow.  We’ll see what it’s like when we get there.

To get to Tongariro National Park we swing by the southern part of Lake Taupo, NZ’s Lake Taupo on a cloudy day.  The lake is huge, an approximately circular inland sealargest lake (it’s huge).  I showed you this lake before (Nov 6, 2013; Rotorua – Geothermal Wonderland).  If you remember, this enormous lake used to be a monster volcano that massively blew in 186 AD, blackening the skies of China and turning the sky of Rome blood-red, half a world away.  The fact that this huge lake is a caldera is astonishing.  The Tongariro National Park is located in this same area of intersecting tectonic plates, and its (much smaller) volcanoes have erupted regularly.  The Tongariro Alpine Crossing traverses this region of active volcanoes, one of which played the part of  Mount Doom in Lord of the Rings.

We’re staying in a fancy place at Whakapapa Village (an interesting name – NZ uses the Chateau Tongariro, with Mt. Ruapehu in the backgroundMaori pronunciation for names, and “wh” is pronounced as an “f”).  We’re at the Chateau Tongariro, a very elegant heritage hotel built in 1929 in Great Gatsby style.  It’s fantastic.  That mountain in the background is Mt. Ruapehu, a ski destination in wintertime but also an active volcano (recent eruptions in 1995, 1996, & 2007 – occasionally emptying its crater lake down the mountainside).  The volcano is best seen from the other side, shown below.  The absence of Mt. Ruapehu’s top is impressive, yes?Mt. Ruapehu, an active volcano and ski slope

The interior of Chateau Tongariro is as elegant  as the outside,  with attentive staff to make you comfortable (“Would you like me to start a fire in the fireplace?  A cup of tea, perhaps?”).  High tea in that interior was a treat, and of course there’s a bar right there.  You feel rich just sitting in one of those chairs.  This Chateau is in the middle of nowhere, mind you, so keeping it going is an amazing feat.

It’s competing with hostels with bunk beds, so maybe that helps.

The view from the Chateau is amazing.  A wide expanse of lawn leads your eye to gentle hills and picturesque mountains, with Mt. Ngauruhoe (Mt. Doom) looming  in the background; at sunset, this magnificent scenery is painted in gorgeous shades of pink and orange.  Wow!

Just before we arrived here, the Tongariro Alpine Crossing was closed, the tour operators no longer operating their drop-off/pick-up service due to heavy snow, and subsequently rain and fog.  In the height of the summer season, the Alpine Crossing is packed, with up to 700 people per day crossing in conga lines from both sides, but this is an iffy time of the year and the crowds are gone.  Since I don’t have winter clothes or crampons with me, Ginger is not going to let me take this hike unless the weather is perfect – and guess what – the weather is perfect!  Most of the snow is gone, the route is clear, and the ranger says I should have no trouble, especially if I wear Ginger’s tights (temperatures are below freezing).  Whoopeeee!  So off I go!  Ginger will hike the nearby trail to Taranaki Falls while I’m doing my thing.

Start of the trail, soon after the car parkI decide to take the 2nd departure at 8am rather than 7, when the temperature will be warmer – but I’ll have an hour less to make the hike.  Still, at an estimated traverse time of 6-8 hours, and pick-up at 3pm and 4pm, I should be fine.  We start out with the sun rising behind the mountains, so we’re in shadow; frost and snow is here-and-there.  Notice how flat the trail starts!  I am not deceived.

The trail is actually flat for quite a while, but then takes off steeply.  A waterfall comes into

view; it may not look like much in this picture, but it’s deceiving – those rocks at the bottom are about people-size!  Mt. Ngauruhoe looms ahead; in the other direction, Mt. Egmont (Mt. Taranaki in Mauri) “peaks” (pun) over the hill from the distant Egmont National Park.  Yep, Mt. Egmont is a volcano too, classified as “active but quiescent (last eruption, 1755)”.  It has it’s own movie fame as the backdrop to The Last Samurai.

Looking back at the car park, left end of the far ridgeWe’re still going up steeply.  Notice how wonderful/ functional the trail is!  I’ve made good progress – the car park is visible at the end of that middle ridge to the left of the people.  Speaking of people, I expected to be pretty lonely on the trail, and I am not!  As it turns out, with the bad weather, hikers holed up for a week and now everybody is out while the hiking is possible.  It’s not crowded, mind you, and having some company is nice.

It’s still quite frosty in the shadows, as you can see on the plants and the smooth old lava flows.  The frost makes the interesting vegetation even more attractive.  I’m now pretty much at the base of Mt. Ngauruhoe, which rears up impressively.  I’ve climbed about a 1000 ft in elevation; oh good, only 1400 more to go!

Another waterfall comes into view, and then we really start to  climb.  The vegetation disappears; this is definitely volcano land.

I’m getting higher, and the trail now has steep drop-offs at the edges!  Notice the fog-filled valley off in the distance – I’ll get to that in the next post, stay tuned.

Finally I’m on the skirts of “Mt Doom”, and it is steep indeed.  And pretty much lifeless.  Mt. Doom indeed!  An information board shows the history of recent eruptions, the last one only 40 years ago.

Mt. Ngauruhoe is impressive this close up.  It has a red, angry lip, and small puffs of steam are escaping from the interior.  I would so love to look down the crater of “Mt. Doom”,

but the side trail up is difficult scree, and more importantly, I don’t have the extra 3 hours.  Next visit, right?

I’ve been hiking up this trail for hours now, and due to the bleakness of the landscape I can still see all the way back to the trailhead, ‘way down there!  That is about to change, however; the trail levels out across an older crater called the South Crater, and I’ll soon be

trading this view for new ones.  One last look at the impressive Mt. Egmont off in the distance.

The South Crater is blessedly flat, but I feel a certain uneasiness in this flatness surrounded by crater walls.  There is a clear cognizance that I am walking in a caldera, and in years past this was not a good place to be!  There is no danger, of

course, but funny how my pace has quickened.  Must be the flatness, surely.  And then the trail heads up again, up a crater wall and then along the crater ridge, with new views.

The trail is steep again!  Steep enough that a cable is provided to allow navigation of a narrow ledge.  The picture on the left doesn’t show the steep part; it was scary enough that I was not tempted to take a picture there, survival being foremost in my thoughts.

A look back (above right) shows Mt. Ngauruhoe and a part of the South Crater; the lower right picture shows a piece of Mt. Ngauruhoe behind a sign indicating a side trail to the smaller Mt. Tongariro, the namesake of this national park.  The trail crosses a saddle between Mt. Ngauruhoe and Mt. Tongariro, a peak that I haven’t shown you because it’s less impressive.  But hey, taking that summit is only an extra hour (or so)!  How can I resist??  So off I go, up a ridge, as shown below.

It’s pretty steep climbing, but the overviews at the summit should be worth the effort.  The picture above right presents a good view of the South Crater, giving you a better feeling for how big and impressive it is.  Then, at the summit of Mt. Tongariro, the My favorite picture of Mt. Ngauruhoeworld is at my feet.  This is why I love climbing mountains!  On a clear day, you can see forever, and with pounding heart and amazed eyes you revel in being alive.  The picture to the left is my favorite view of Mt. Ngauruhoe.  Now let’s look around to new views, ones we will be visiting shortly.  First, the Blue Lake.

I plan to have a late lunch there at the lake (carrot reward; works for donkeys, doesn’t it?).  If you look at that notch in the left image, it’s pretty spectacular.  There’s this low-flying “cloud” below the notch (turns out it’s not your normal cloud), and the view beyond is the

very beautiful Lake Taupo.  The view is gorgeous!!  I can see the horizon for most of the 360; the view is probably better than one of those $1 mil Space Shuttle tourist rides.

To get to that Blue Lake, I must first hike past the Red Crater and the Emerald Lakes; sounds colorful, doesn’t it?  I can see some of the Emerald Lakes from here (below right).

Don’t they look cool?  The picture on the left shows the way down … time to get truckin’.

I’m back on the Alpine Crossing Trail again, and apparently walking past the Red Crater,

but the view is confusing; I can’t really see a crater, but those walls are definitely red!  In the left picture below you can see the “mini-mountain” that I have to climb; doesn’t it

look like this is the end of the trail?  Some big monster ate the rest of the mountain?  Any descent looks like it will be steep!  When I get to the top, there is a nice view of my lunch site, the Blue Lake, and Lake Taupo behind that.  Gorgeous!  But concentrate: we’re going very down-down, quickly, to the Emerald Lakes.  As you can see in the pictures below, the

Emerald Lakes are stunning – and the trail (indicated by the people on it) seems more fit for lemmings.  The trail isn’t quite vertical, it’s more like a playground slide; it’s really steep, mostly sandy – a black sandy pumice – and there seem to be 2 choices to get down; going extremely slowly, which most people are doing, sometimes on their butt (this seems to be a collection point for people, it’s crowded), or falling/sliding/skating at great speed (involving some dodging).  Either way, a lot of people are falling, so why go slow?  Well, I only fell once, probably par for the course; broke the plastic protector over the viewing screen of my camera – happily, no real harm done.

I’m now at the Emerald Lakes, and they’re really pretty!  As shown below, they exhibit a

variety of shades of green within the same lake, along with other colors like yellow and blue.  Notice the steam coming from behind one of the lakes, top right picture; it’s proof we’re on a volcano, with Smaug under our feet!  The bottom right picture shows one of the steam vents.  Pretty cool!  Anyone for spelunking?

Leaving the Emerald lakes, the trail goes up and provides a great view of the lake and the broad vista beyond.  It’s a very beautiful area!  Turning around, I finally see enough of

the Red Crater to discern that it is a crater.  That last picture also shows the sliding-path down, which you might notice is very steep and downright vertical at some spots.

Once again I’m hiking across a caldera in volcano land – this one called the Central Crater (below).  There is a creatively named North Crater, which you can see in the first picture of the Blue Lake that I showed earlier, but the trail doesn’t go across it.  The

trail then goes up to the Blue Lake, pretty steeply, but the elevation affords a spectacular overview looking back.  Look at those volcanoes all lined up in the picture on the right!  The snow-covered peak behind Mt. Ngauruhoe is Mt. Ruapehu.  It’s pretty clear where those tectonic plates are intersecting!

There’s not much view from the Blue Lake, other than the Blue Lake itself, but it’s pretty enough!  The lake is not just blue; like the Emerald Lakes, the periphery of the Blue Lake

is a variety of colors.  Lunch here is a nice respite.  In addition to water, I’ve been carrying a Coke, and with lunch it tastes oh so very good!  Must be the sugar.  From here on, the trail will be all downhill – that’s the good news.  The bad news, I’m not too much more than half-way across the Alpine Crossing.

Leaving the Blue Lake, the trail goes to that notch in the mountains I pointed out from the

top of Mt. Tongariro.  That low-flying “cloud” is still there, below the notch.  And it’s a pretty active cloud, being blown around a bit; swirling, really.  Eh, what?  I’ve been in lots of clouds in mountains before, but it’s always been more of a creeping nebulous fog that surrounds all; not so well defined and discrete as this one.  Walking further,

with the cloud still ahead, a sign portends the answer.  Another volcano?  Haven’t I left them?  Around the next bend I am suddenly confronted by a mountainside going Vegetation everywhere, as far as the eye can see; cloud in backgrounddown, seemingly forever, and covered in colorful vegetation – not your volcano scenario.  It’s a looooooong mountainside, with amazingly long switchbacks terracing into the distance.  The switchbacks go towards and then away from the cloud; sometimes the wind blows the cloud over the trail.

Still, the source of the cloud remains a mystery, until I encounter this sign, below left; the cloud must be steam escaping from somewhere, but there is nothing remotely resembling

a volcano here.  On a long leg away from the cloud source there does come into view a bleak area of the hillside that is emitting steam from small fumaroles, but it’s not much, and that steam just vaporizes into the air.  However, on the long return toward the cloud, the wind shifts up the mountain and the cloud source is revealed.  It’s still far away, but the side of the mountain is really smoking!  As I get closer, steam is absolutely pouring from a large ravine in the mountain, with a long string of fumaroles venting from along the

top of the ravine.  A very lifeless ravine, may I add.  What is coming out of this volcano is steam, forming a harmless cloud that we walk in and out of multiple times.  But I can imagine, in more exciting times, that the steam could be gray ash, and we can’t breathe, and retreat is impossible.  I’m very happy that this mountain is a sleeping dog!

I’ve actually been running down many of these switchbacks; the distance markers suggest that I could make the 3pm shuttle if I hurry; otherwise I’ll have the better part of an hour to wait.  However, the view from the trail is not bad!  So I stop to take some pictures.

The active volcano (fumarole) regionThis is a last look back at the cloud generation.  It’s a lot of steam!!

Finally I’m finished with the switchbacks and long mountainside, and into forest primeval.  The occasional markers giving distance to the car park say I can still make it by 3pm – really, I should have been closer by my reckoning – but as I run/walk down the trail, and the time marches along, it looks like it’s not going to happen.  The markers have lied!!  Ah well, the forest is pretty.

In discussions with others at the car park, waiting for the shuttle to show, there is universal agreement that the markers showing distance were very misleading.  I will close Silver fern, iconic symbol of New Zealandwith a picture of a silver fern, the iconic symbol of NZ.

What a fabulous hike!


Leaving NZ – Revisiting Marlborough Sounds (and Hawke’s Bay)

Snow on the mountains; view from our Ruby Bay houseIt’s getting rather cold, now that it’s autumn (end of May); this picture was taken from the balcony of our house in Ruby Bay, looking in the direction opposite the bay.  Snow on the mountains.  And, alas, time to leave NZ.  We’ve gotten 3 email reminders from Immigration that our time to leave is fast approaching (efficient, that office).   So we’re off to Auckland to sell back our car.  We get to do the Marlborough Sounds/Cook Strait ferry trip again – hopefully in sunshine this time – but our primary aim on the way back to Auckland is to see the Tongariro National Park – and maybe hike the Tongariro Alpine Crossing, the most popular day hike in NZ.  We’ll see; it’s pretty iffy this time of year, when snow can make it impassable.  Oh yeah, and we’ll visit (or revisit) some wineries on the way back – why not??

We finish cleaning the house, pack everything into the car, and head off to Picton to connect with the ferry.  We’ll be making the same trip between the North and South Islands that we did in December, but in reverse.  That first trip was made through the middle of a fog bank (Dec. 12; “Marlborough – The Sound, The Wine“). Hopefully this time will be different!  As we pull away from Picton, early early in the morning, we are greeted by bright sunshine fore and aft.  All Right!!!

The water is calm, the temperature cool, the air crystal clear; it’s a perfect morning.  We’re navigating the same Queen Charlotte part of the Marlborough Sounds as before, but the view is strikingly different from our earlier trip; the view of the mountains meeting the water is very pretty, but it’s missing the atmospherics of the fog that I had so decried on our first trip.  Below are pictures from along the route.  At one point Ginger finds me (it’s a big boat!) to that say there are dolphins playing in our wake; alas, when I get to the stern they are gone.

Suddenly, around a bend (there are many bends!), I can see a clear demarcation in the water; we are about to enter Cook Strait, and our calm water is going away!  Pretty dramatically!

Oh yeah, there is a (pardon the pun) sea change in the water!  The waves are crashing on the rocks, and this big lumbering boat is swaying pretty hard.  Perhaps in the upper right picture below you can get a feeling for the large swells, although it feels much rougher than it looks in the picture.

There are some very pretty views to be had as we pull away from the South Island, and these help take our minds off the rolling ship.

The middle of the Strait is pretty uninteresting unless you like to count the swells rocking the boat.  Some of the passengers soon take to fresh air, hanging over the railing, but we’re good.  Ginger took a Bonine before boarding, and I buy a ginger beer as therapy.  A couple of rocking hours later we approach Wellington and its bay on the North Island, and the water becomes both calmer and prettier.

We showed you Wellington before (Dec 5, 2013, “Wellington City and WOW!”), so I’ll just On the road to the Waipara Valley - and wine!end this section with a shot of the beautiful mountains (and winding road!) on our way to a quick stop in the Martinborough wine region.  We plan to have lunch there and revisit a couple of our favorite wineries.  We can’t stay long because (1) I’m driving and can’t drink much, and (2) we’re due in Napier where we’ve scheduled a few days to further explore wineries in our favorite wine region, Hawke’s Bay.  Work, work, work!

……………………………………………………………………………

MARTINBOROUGH AND HAWKE’S BAY WINES

We covered these wine regions in a previous post (Dec 6, 2013; “Napier, Hawke’s Bay, and … Martinborough?“).  Martinborough is not small, it’s tiny; but they do have some wonderful wines.  They’re almost on the way to Napier and Hawke’s Bay, so the small detour won’t cost us too much.  One of our Martinborough favorites, Murdoch JamesBesides, we really want to revisit some of our favorites.  Alas, Coney Wines was closed, but we did find Murdoch James open.  Yummmmmmm!  Fortified Pinot Noir may sound weird, but it’s really good!  Then off to Hawke’s Bay.  The wineries here are spread over a large area, and we missed a lot of them the first time through; but we’ll make up for that now!

Map of Hawke's Bay WineriesAs you can see from the map, the wineries (the small numbered squares) are scattered over a large area.   Intervening cities and the distance between wineries make it hard to visit very many in a day.  The first time through we concentrated on the northern ones (as well as sight-seeing in Napier), so didn’t cover much territory – but we loved what we covered!!  This time we’ll concentrate on the more southerly wineries.  Alas, there’s no way we can do them all; next trip, right?  Below are pictures of a couple that we really liked  – Alpha Domus and Elephant Hill, and below that the elegant Craggy Range.

Some of our favorites are shown below, but we shouldn’t forget Black Barn, and certainly not Church Road.

Next post, Tongariro National Park – for me, the highlight of our NZ trip!

Revisiting Nelson Lakes, with company

Brian and Janaki, Mt Roberts to the rightI’ve shown you Nelson Lakes National Park before (post of Dec 29 2013, “Nelson Lakes National Park“).  It’s a pretty area, nestled at the northernmost limit of the Southern Alps and serviced by the sleepy village of St. Arnaud, population 100.  This time we are revisiting with company – similar to our last post on Abel Tasman National Park.  First to visit is our son Brian and his girlfriend Janaki.  When last we were here, Ginger climbed the challenging Mt. Robert (that mountain on the right), a 2,000 foot ascent up the Pinchgut Track, correctly labeled “steep”.  Due to the lateness of the day and impending clouds, on that climb we had backtracked down the Pinchgut rather than complete the slightly longer 6 mile loop.  This time we plan to do the reverse climb, doing the 6 mile loop and only going down the Pinchgut.  Alas, when we get there, that trail head has signs saying it is temporarily closed.  Rats!  So off we go, once again up the Pinchgut.

What makes the trip more interesting for us is that Janaki, bless her heart, has never hiked up a mountain, much less one that’s a hard 2ooo feet up.  The path starts gently, but rapidly turns into a series of steep switchbacks.  Early on, Ginger realizes that this is not her day to hike and decides it would be wise to turn back, particularly since she’s done this hike before.  The rest of us continue on,  but as we look out from the trail, we discover that the high clouds (visible in the first picture) are not quite so high anymore; they’re lower, and they’re coming our way.  Nooooooooooo!

We keep climbing, and the clouds keep lowering.  As you may remember, the trail goes in and out of the woods, but when it comes out, the view below is increasingly and disappointingly obscured.  Janaki, however, is doing great and is plowing uphill just fine,

in spite of the impressive incline.  The view is crap, but the kids are enjoying being inside a cloud.  OK, but what about the view you’re missing?

Janaki and the view (or lack thereof) from the topFinally we clear the woods for the last time and shortly we’re at the plateau top.  Yeah, the loop continues up a little further, but what’s the point?  The view won’t change!  So back down the Pinchgut we go, still stuck inside that darn cloud!  I’m grumbling in my beard, but the kids still think being in a cloud is cool.

Just two final photos: the view back at the trailhead, with victorious climbers Brian and Janaki; and the view of the lake and the mountain from St. Arnaud, showing Mt. Robert being sat on by a cloud – which, on the right side of the mountain, funnels right down the Pinchgut track!

Those clouds are just mean!

………………………………………………………………………………………………………………………………………………………………………………………………….

The trail in a pretty birch tree forestNext to visit Nelson Lakes is John Chang, our California friend.  This time we’ll climb the mountains on the other side of Lake Rotoiti, the St. Arnaud range; it’s a tougher climb, a longer and higher up-and-back.  A disadvantage of this climb is that, unlike Mt. Robert where the trail goes in and out of the woods, offering panoramic views as you go (if you’re not inside a cloud), this climb is all woods most of the way until you finally emerge onto treeless tundra.  At the start the trail is pretty smooth and gentle, and the birch forest is beautiful.  Soon, however, the trail heads up – rather steeply – and becomes rough, peppered with rocks and roots.

On the rocky outcrop with a view of Mt RobertsWe finally clear the forest – we’ve been working hard! – and not far away is a rocky outcrop with a view.  This is the turn-around point for many climbers, and we decide to stop here for our well-earned lunch as we catch our breath and cool our heels.  It’s a pretty view, Mt Robert and Lake Rotoiti in front of us, and the valley heading north off to our right, as shown below.

The view up from our rocky outcropWe, of course, will not be deterred from reaching the top.  No wimps, we!  You will note, however, from the picture to the side, that the terrain is wickedly steep.  We’ll actually be climbing up the mountain to the left of this picture, but it’s no less steep!  The picture below shows some pretty flora on the mountainside Pretty plants on the mountainsideas we hike up – I’m taking pictures of flowers, not catching my breath, honest!

Going up the steep incline, we occasionally stop and turn around to catch the increasingly awesome view of our stoney outcrop, Mt Robert, Lake Rotoiti, St. Arnaud, and the mountains in the distance.Half-way up the steep part

Near the top it gets really steep (it wasn’t before?) and we have to use our hands as well as our feet to go up; we’re crawling!  And then we’re there.

It’s bloomin’ Awesome!  Unlike Mt. Robert, this ridge top is sharp, so there is a nearly 360º view – including the other side of the mountain that we have never seen.  To start off, let me show you the view you’ve been seeing, that of Mt. Robert.  Note in the foreground that it looks like you’ll fall off a cliff if you take a step forward.  Yep, the climb up was steep!  The trail continues at a right angle along the ridge, but that must be for hikers spending the night somewhere.  We’re

happy not to be going further!  Pictures can’t capture the whole gorgeous scene, but I’ll show you a few.

A strange plantSome of the plants up here are pretty interesting – for example, this thing growing on the rocks.

Time to go back down, and Surprise!  Going down that steep part turns out to be more of a challenge than going up!  The pictures below don’t do the steepness any justice – pointing the camera downhill flattens the terrain.  We find that walking this section is impossible, sliding is not a great option, and the only thing that works is to sidestep/slide/fall without a lot of control, heading toward a big rock or clump of grass (hopefully anchored) to stomp on to arrest the downward momentum.  It’s more tricky than it sounds, and – ah – not always successful!

One last view of Mt Robert and Lake Rotoiti from above, and the tough trail going down.

We are, in fact, getting very tired navigating the hard trail, which is more step down and jump than walk a path.  Our legs are getting shaky and threatening to cramp, but The St Arnaud range; we hiked up the middle foldwe finally make it back, tired but happy.  Our hike took us up the middle fold of that St Arnaud range – reasonably impressive, yeah?

A final look at lake Rotoiti – and one of its inhabitants, an eel.

Next post – leaving the South Island.

Abel Tasman National Park

You may remember that, early in our sojourn on the South Island, we traveled to the west side of Abel Tasman National Park but only hiked a piece of one of the inland trails due to Ginger recovering from back issues (Dec 30, “Abel Tasman National Park and Golden Bay“).  We had no real views of the beaches that Abel Tasman is famous for; now we intend to do better!  This time we’ll approach the park from the east, take a trip by sea kayak, and hike the seaside trails above the beaches.  Abel Tasman is NZ’s smallest national park, and one of it’s most popular, with stunningly beautiful golden sandy beaches, crystal-clear water, lush green bushland, striking granite outcrops, and an abundance of wildlife.  Sounds good to us!  It is also only 20 miles away from our house, one of the many attractions that led us to this area.

I’m going to show you this pretty part of the world via three of our trips with visitors: my sister Linda, our son Brian with his girlfriend Janaki, and a good friend, John Chang.

SEA KAYAKING

Kaiteriteri beach, looking out to the Tasman BayOn our first foray, we take my sister sea kayaking from Kaiteriteri, a small village just south of the Park.  Looks nice and peaceful, doesn’t it?  After a brief lesson we gear up and, just us with guides, head into the park waters.  It’s really pleasant – all the short way to that island on the left, whereupon we enter Tasman Bay and encounter wave swells higher than the kayaks!  We’re going to Split Apple Rock, about an hour’s paddle away, but how to get there is an issue – we need to take the waves head on, but heading directly toward Split Apple Rock  Split Apple Rockputs the kayaks broadside to the waves; so we compromise and make an arc, taking the waves at an angle.  Tough paddling!!!  Our outing rapidly becomes hard work!  With great perseverance we make it to Split Apple, and calm water.  It’s a pretty place; the water is a beautiful color; the rocks are interesting; and we get to paddle through a small cave.

Then it’s time for a well-deserved lunch break, and we land at a nearby gorgeous beach.  Look at that water!

Groan, now we have to kayak back!  Thankfully, the waves and wind actually help us on the return, but the quiet bay is a welcome end to the trip.  In spite of waterproof jackets and kayak skirts, we find we’re thoroughly drenched; our muscles ache in places we didn’t know we had, and we’re beyond tired!  We’ll sleep like the dead tonight.  We decide we’ve have had enough of sea kayaking – at least in rough water!

ABEL TASMAN

Abel Tasman has a Coast Track and a number of Inland Tracks, but most people opt for the coastal route with its idyllic beaches.  To do the complete Coast Track  would take 3-5 days, but there are several water taxis that will take you to different drop-off points and pick you up at appointed times at the end of your hike, giving you 6 different choices for day hikes – although several of these hikes are time-critical due to sections of the trail being under water at high tide.  With Brian and Janaki now along, we decide to simply start at the beginning and hike until somebody decides it’s time to head back.

At the start, the tide is out – impressively ‘way out!  The tidal flats keep going, and the Tasman Sea is off in the distance, resulting in interesting bands of color.  I can picture

us lounging on that sandy beach and wading in the rivulets of that ephemeral land, but there is more to see that beckons us on. It’s tempting, though!

The tail is relatively flat and easy – and attractive, often with a view of the water and

Pretty beach beaches.  We explore some of the beaches, and then choose a pretty one to host our lunch.  Although the trail itself is easy, getting down to some of the beaches is a bit of a challenge.  There are paths going to them, but they’re invariably steep; definitely worthwhile, though!  We are sharing “our” beach with a handful of other people, but it’s such a big, long beach that we feel as if we have it to ourselves.  Nice!

It’s really beautiful!  The sand is wonderful, the water gorgeous, the beach comes with caves and rock formations to explore, and there are picturesque islands and mountains in the distance. The large rocks make nice tables and chairs; the view is hard to beat.

Further down the beach are some quite pretty shags that are not at all afraid of me; one tells me that I’m trespassing, in no uncertain terms.

Islands in the bay


Back on the trail again, we wander a bit further, with more views of beaches and islands offshore.  Then, alas, it is time to turn back.


Next to visit us is a friend from California, John Chang.  Before going back to Abel Tasman, we of course had to visit a few nearby wineries – consider it fuel for the hike!  Maybe you notice that life isn’t bad here?

We have a habit of not being early risers, and this time it bites us; when we arrive at the Abel Tasman water taxis, we’ve missed the outgoing trips to parts unknown.  The only option is to start hiking from the beginning of the trailhead again; rats!  But this time we’ll go further, and zoom past the early regions.  The repeat trip is still pretty!

Beach with a viewIt’s a cool, cloudy, windy day (it’s early autumn here), and there are not many people on the trail; the golden beaches with their crystal-clear waters are deserted.  We find a beach that’s big and looks gorgeous from up above.  It’s quite a scramble down the steep path – coming up will be a struggle – but it’s worth the effort.


Beach flowersWe even find a patch of late-blooming beach flowers before we scramble back up to the trail.  It’s getting late, though, and time to head for home – with maybe a stop at a local pub for a thirst-quencher.  Hope you enjoyed this part of Abel Tasman.  Our only regret is that we weren’t able to spend more time hiking in this beautiful park.

Next post – back to Nelson Lakes National Park!

Haast Pass and the Fox and Franz Josef Glaciers

We’re making a mad (long) dash between Queenstown and the West Coast’s Fox Glacier, so there’s not too much time to observe the sights along the way – short hikes only.  We will take a last look at Queenstown as we leave it.

Note the landing strip in the last picture, which you saw in the video from the previous post (June 24, “Queenstown, Arrowtown and the Routeburn“).  After leaving the mountains, the road passes the pretty Lake Hawea and the northern part of Lake Wanaka.  As usual, New Zealand’s water/mountain/cloud combos are special – a visual treat.  Lake Hawea pictures are below.

Lake WanakaTo the left is a view of the northern reaches of Lake Wanaka (I showed some of its southern parts in an earlier post – April 7, “Wanaka and the Rob Roy Valley“).

HAAST PASS

The Haast Pass goes though the upper regions of Mt. Aspiring National Park (visited in the Rob Roy trip mentioned above).  It’s a pretty area; the road follows an old greenstone trading route and the cascading Haast River.  We take time to do some short walks, such as the Blue Pools Walk below.  Note how unbelievably clear the water is!  We see large fish (not shown) that seem to be practically swimming in air.

Another short walk was to Fantail Falls.  Yes the waterfall is pretty, as is the associated stream-in-a-hurry, but look at the river rocks!  Even the rocks in NZ are gorgeous!

We also visit the impressive Thunder Creek Falls.  Again, there are attractive veined rocks.  The surrounding forest wasn’t too bad either.

We finally arrive at the stormy West Coast and make a beeline for Fox Glacier.  As I noted in an earlier post, the West Coast is stormy and wet, getting 12-30 feet of rain a year.  It is not sunny today, and one can certainly tell which way the wind blows!

FOX GLACIER

Brochure picture of Fox GlacierWithin a few horizontal miles the terrain drops from 10,000 feet to a rain forest just above sea level, and both the Fox and Franz Josef glaciers creak down the steep incline at world-record pace, aided by the snow pack on top getting about 120 feet of new snow each year.  It should look something like that picture to the left, but the sky is all swirling cloud, visibility is limited, and we’re behind a mountain.  What we do see from afar is impressive enough, though!

We learn that it is supposed to rain tomorrow; if we want to see the glacier, now is the time (and it’s getting late).  So off we go.  The glacier has receded nearly 2 miles since 1750, and that’s the walk ahead of us.

As we slog along, we are greeted by a number of small waterfalls and creeks coming down from the mountains.

Again, the rocks along the trail are veined and beautiful!  Even the little pieces of gravel are too pretty to resist taking a piece home.

We arrive at trail’s end and find that Kea (alpine parrots) are already there, trying to help us get closer by untying barricade lines and eating warning signs.  Two of them are working the warning signs together, one trying to eat it from the top, one from below.  They really seem to be gremlins, disguised as pretty birds.

As it turns out, we can’t get very close to the glacier – two teenagers were recently killed when pieces broke off and buried them (they’re still there, impossible to retrieve).  The glacier also makes a right-angle turn, and we can only see up to that point.  Still it’s impressive enough, and pretty as the sun sets.

Nothing to do but hike out in the increasing gloom – and gather pretty rocks, of course.

One last look back, from a higher vantage point on the way out.

The weatherman got it right, and the next day it’s raining.  I had wanted to do a Glacier walk, picture from brochure guided 4-hour glacier walk, such as shown in this picture from a brochure, but we are short on time, the ladies are far from enthusiastic, and the rain clinches the “nope”.  Instead we’ll do the popular Lake Matheson Walk, with it’s iconic view of Mt Cook and Mt. Taman reflected in its water.  Or in our case, the reflected rain clouds?

In spite of the drizzle, it’s a lovely walk, with mountains in every direction.

Then it’s into the woods to drip our way through the ferns and mosses.

As shown in the first picture below, the “iconic view” of Mt Cook and Mt. Taman is not reflected in the lake today, alas.  Near the end of the walk the rain clears briefly, and we do get a reflection; just not of the big mountains.  Still, it’s worth the price of admission.

FRANZ JOSEF GLACIER

The walk in to Franz JosefFranz Josef is nearby, so we’re there quickly, and the rain has come with us.  We start the hike to the glacier, and discover there’s a benefit to this wet stuff; there are a lot of waterfalls along the trail, and nice ones at that!  They’re not huge waterfalls, but hey, I’ll take small and picturesque!

A wall of waterfallsFurther along the trail we encounter a region with a multitude of waterfalls cascading down the cliff face.  Although most of the waterfalls come prettily in and out of view on their way down, the falls on the far right remains in sight quite a distance and is impressive indeed, as shown in the pictures below.

As we hike further in, the dark cliffs and gray skies become a bit forbidding if not downright sinister.

Another waterfall or two, and then we’re there.

We are looking at one BIG front of ice!  It’s very impressive.

Surprisingly, some of the clouds suddenly clear, and we have patches of blue sky!  How about that!

On the way out, we see another waterfall that was hidden behind one of the cliff walls.  Also some cute wildflowers.  As the sky clears – which it’s doing quickly – the force of the wind up there on the top is revealed in the sweeping curved sculpture of snow peeking above the mountains.  It may not be friendly up there!  We pass again the twin waterfalls shown earlier, still very pretty.

Looking back at the glacier and scoured valleyFinally, a look back – in sunlight! – at the glacier with its scoured-out valley and waterfalls on both sides.  Hopefully you’re impressed!

Oh, and one last picture below of snow on a mountain top, with an appealing shape.  Snow on the mountain

The next day, it is time to head “home” to Nelson.  Below is a last shot of this pretty area of Franz Josef – and just for good measure, a picture of the ladies enjoying sculpture on the beach in Hokitika (notice the crashing waves in the background!).

Next stop – back to the Nelson area, and Abel Tasman National Park.